Critical Making 1: Finding Your Superpower Through Digital and Physical Making
Critical Making 1 is a first semester project-based studio course that provides a foundation in the creative process of making with new and emerging digital and physical technologies responsible for building the products and services impacting the world around us.
In this course students work towards becoming fluent across digital and physical creative practices used in the development of new products and services. This includes working with modern web development languages and frameworks to produce functional prototypes, experimenting with creative coding and media production tools to create digital content and interactive experiences, surveying Computer-Aided Design (CAD) tools for 3D modeling and visualization, and leveraging digital fabrication tools to produce physical objects.
The course will culminate in a final project leveraging the various digital and physical tools, techniques, skills, and knowledge gained throughout the semester. Project examples include web based applications, connected experiences, smart devices, everyday/enchanted/functional objects, media based installations, and product based experiences.
Day and Time:
APRD-5005-003 / AM Section - Monday, 9 am - 12 pm
APRD-5005-001 / PM Section - Monday, 1 pm - 4 pm
Instructor:
RJ Duran
rj.duran@colorado.edu
Slack: @rjduran. #cmstudio on cmcistudio.slack.com
Office hours by appointment. Feel free to reach out to me via slack or email.
Syllabus:
This website is a real-time version of the course syllabus. It is updated weekly throughout the semester. A static version can be downloaded here.
Course Resources
This website is the primary resource for all Critical Making Studio courses. Some of the resources used across the different courses are divided up into sections found on the left sidebar. Course specific resources will be found within the course schedule page specific to each course, also found on the left sidebar.
Do I need to know all of these tools? No! Think of these resources as maps containing many possible tools that could help you accomplish your work and from which you can choose some to learn and work with. There are pros and cons to any tool and all have a set of functionalities and a purpose. As with any tool and any kind of personal creative process you are free to choose anything that works for you.
In addition to the tools found here in the digital space, you have access to physical tools for building anything you can imagine here at the studio, on campus at the Idea Forge, or in the community at BLDG61.
Our Studios
CMCI Studio facilities include the large main room (West Studio) and adjacent smaller room (North Studio). Both rooms contain different functionalities for developing projects at varying scales and for varying audiences. Read through the Studio Handbook for learning about each room and accessing the various tools and capabilities we have on site.
Idea Forge
The Idea Forge is an on-campus design and fabrication facility open to all students located in the Fleming Building (near the Wolf Law Building at Broadway & Baseline Rd). In this course we will be making use of the tools and resources available to build projects and develop skills. Learn more at https://www.colorado.edu/ideaforge/.
BLDG61: Boulder Library Makerspace
BLDG 61 is a free community workshop that provides maker education and technology to the public in a creative and inclusive environment. They are located nearby, just down the street from our studio. They offer a variety of free workshops and access to tools and knowledge within the larger Boulder community. I highly recommend becoming familiar with their space. Learn more at https://boulderlibrary.org/bldg61/.
Course Workload
- The CM1 is a 3 credit hour course. You should expect to dedicate at least 2-3 hours per credit hour. This translates into a 6-9 hours per week. Consider 6 hours a minimum expectation for one studio course and plan accordingly with your other studio courses.
- Assignments for the course consist of weekly blog posts demonstrating project-based and process oriented research and explorations in making. Assignment parameters will be based on the topic of the week and "due" the following week by the start of class time. Refer to the Course Deliverables section for more information.
- The course is organized into weekly meetings consisting of instructor led project-driven topics organized as workshops and studio work sessions. It is expected that all students are active participants in each session.
Course Deliverables
CM1 is a project based course and largely driven by student research and interests. As such, each deliverable is expected to vary based on the project parameters and requirements. The following outlines the general criteria for course deliverables throughout the semester.
Blog Posts
- A minimum of 1 weekly blog post published to your Critical Making blog. Medium is widely used but any blogging platform may be used.
- Posts are to be submitted via slack #cmstudio by the specified due date each week.
- It is recommended that a post includes a variety of media and content to support the subject matter. For example: text, images, video, graphics, photos, mockups, screen captures, tutorials, 3d model viewers (sketchfab), sketches, code, gifs, references, etc. Anything that is required to effectively communicate the details of a project, process, prototype, or idea.
- The subject matter is in response to the topics of the week. Ideally, it falls in line with your interests, research area, project, creative process, etc. For example, you might consider doing a series of tutorials on a topic that interests you or a process/workflow you are currently exploring through the course.
- Posts should be written to the best of your abilities and for a public audience. The post and any accompanying visual content (images, video) may be shared on social media.
- In total, you should have minimum of 12 posts for the semester. Failure to submit all blog posts for this studio will result in a failing grade.
- 9 weekly blog posts for assignments. Submitted by the last day of classes - Thursday, December 12th, 2019.
- 2 blog posts for your (1) final project proposal and (2) final documentation. Final project documentation due by Monday, December 16th, 2019.
- 1 summary blog post consisting of links to all your posts for the course. (Its so meta I know but really helpful too.) Feel free to include any tidbits of wisdom, lessons learned, or advice to future cohorts diving into critical making. Due by Monday, December 16th, 2019.
Final Project Proposal
Submit a proposal for a final project you intend to excute on for the final 3-4 weeks of the course and present in the last week of classes. Use the development of this proposal as an opportunity to ask questions about any subject matter you learned about in class and are interested in becoming more skilled with and/or knowledgeable in. Your proposal should be formatted as a blog post on your critical making blog with all supporting media contained within the post.
Deliverable:
A new or updated proposal posted to your blog. It should include the following:
- Project Title
- Project Summary ~ 1 page max
- What is it? What's it's purpose?
- What problem(s) are you solving?
- What will it do?
- How will it work?
- What challenges do you anticipate?
- In what ways does it or will it relate to your other work in Entrepreneurial Design, Design Leadership, and/or UX?
- Key components of your project
- What resources, skills, and technologies are needed to realize it?
- What kind of fidelity do you want to achieve?
- What "materials" do you need to use? Wood, Metal, Plastics, 3d models, CAD, 3d Printing, Electronics, Arduino, Sensors/Devices, Processing, Mobile Devices, etc
- What research have you done and/or still need to do?
- Milestones you have hit thus far and what you plan to do in order to realize it in the next 3-4 weeks.
- If you need to order parts and supplies, what do you need?
- What questions do you have?
- Where do you feel you are lacking in skill and need assistance?
Share the URL to your post on slack #cmstudio.
Final Project
- The final project produced will be presented in the final week of class. Wednesday, December 11th, 6-8pm.
- Documentation is to be submitted the form of a blog post with all supporting media necessary to explain the project development and outcomes. The general criteria outlined above applies to this final post. I highly suggest preparing a presentation of some kind (slides, video, experience, demonstration, exhibition). Be sure to include links to past blog posts and any resources used in the process.
- What problem did you set out to solve?
- What is your project all about?
- How did you accomplish your goals?
- What resources did you make use of?
- What challenges did you encounter and how did you overcome them?
- What worked? What didn't?
- If this is a part of a larger long-term project, what milestones did you hit?
- What's next for this project? (Future Work)
- What are your major takeaways? What did you learn / discover?
Share the URL to your post on slack #cmstudio.
Course Themes
- Building Creative Habits and Practices
- Emerging Tech
- Rapid Prototyping
- Product Development
- Materials
- Digital Fabrication
- Physical Computing / IoT
- Interactive and Immersive Digital / Physical Experiences
- Parametric Modeling and Design
- Deconstructing Problems and Solutions
- Analyzing Systems of Logic
- Hardware UX
Week 1: Overview
Aug 30 (Friday)
- Intros / Course Overview
- CM1 Student Questionnaire
- Tools of Critical Making
- Making "making" a practice
- Mind Mapping
- Deconstructing Objects
- Emerging Tech
Links from class
- E-Nable - 3D printed prosthetics
- The Digital Factory Conference
- Embla Candles / Instagram - Fun brand utilizing 3d printing to make candles.
- Bantam Tools Podcast: The Edge - A great podcast about design and technology.
- CW&T / Instagram
- South by Southwest (SXSW)
- emagine_that - Thanks Yvonne!
- Computer History Museum - Thanks Aitana! Also, look at some historical links under History of the Electronics, Computers, and the Internet in left sidebar.
- Instructables
- Richard Serra Verb List (MOMA) / PDF
- Gillette + Formlabs Razor Maker
- Meow Wolf
- Cradle to Cradle: Remaking the Way We Make Things
- Biomimicry: Innovation Inspired by Nature
- The Age of Surveillance Capitalism: The Fight for a Human Future at the New Frontier of Power - Thanks Clayton!
- Sleepwalkers Podcast - A podcast about AI, Machine Learning, Data, and Privacy.
- Lynda.com for students
- Things Organized Neatly - Thanks Dave!
- Significant Nonsense - Thanks Dave!
- 1 Second Everyday App - Thanks Caro!
- Pancake Printer Instructable
- Filastruder
Studios
NOTE: The content below has been added to the newly created Creative Industries page.
- Project One Studio / Instagram
- Vvoxstudio / Volvoxlabs / Instagram
- Moment Factory (Lab)
- Softlab / Instagram
- Respons_ve / Instagram
- Field.io / Field.io Research: Journery into VR / Instagram
- Symmetry Labs / Instagram
Project Inspiration
- Creative Applications
- Autodesk Pier 9 Residency Projects - Wayback Machine link from Dec 2018
- 50 of the most important Raspberry Pi Sensors and Components
Instagram Accounts
Maps
- Design thinking origin story plus some of the people who made it all happen - A great map showing the history and evolution of design thinking. Look at the pdf near the end of the article.
- Envisioning Horizons 2013 Map - An emerging tech map / research done by Envisioning.
- Age of Entanglement by Neri Oxman - An outstanding article and map / chart (The Krebs Cycle of Creativity).
- Tim Rodenbroeker - Input / Output Map
- Bauhaus Curriculum / Bauhaus || The School of Everything
Opportunities
- Design for America, the student group that connects with community partners to work towards solving local, social challenges using the design thinking method, is having their kickoff meeting on Wednesday, 9/4 at 7 pm in Mesa B Conference Room in Fleming, at the Idea Forge (free parking!). Learn more at https://www.colorado.edu/designforamerica/projects.
- Global Access 2030 (GA2030) - Ongoing project by local social entrepreneur Roger Cabbage. If you are interested I can provide more details.
Assignment 1: Know thyself
Your first assignment consists of 3 parts:
Part 1: Make a map
Generate a map of some kind that communicates your journey to CMCI Studio. Such a map might be a timeline, visualization, info graphic, mind map, photographic series, video, written document, or any combination of these formats. Include your interests and pursuits in CMCI Studio.
Questions:
- What led you to CMCI Studio?
- What is your question?
- Based on the survey, what do you feel strong in and what are you excited to learn more about through this course?
- Where do you see yourself by the end of the program?
- If you could design and build anything, what would it be?
Part 2: Things I love and hate
Choose 3 things you love (or like) and 3 things you hate (or dislike) and describe what they mean to you and why. Possible choices might be products, objects, artifacts, or experiences.
Questions:
- What’s their story?
- Who made them and why?
- Why do or did they exist?
- Why do you find them intriguing or despise them?
Part 3: Setup a "maker" blog
Setup a blog to document your Critical Making experience.
What if I already have a website/blog? Great! Just make sure you tag or categorize your posts with "Critical Making 1" so they are easy to locate.
If you do not yet have a blog or wish to setup a dedicated site for this course, you have a plethora of options to choose from. Feel free to use whatever works for you to submit your work in blog post format. Many STCM students choose to use Medium because it's used to submit posts for RE.
Examples by previous students:
Karen McClellan (C10), Allison Speigel (C10), Jonas Escobedo (C10), Sarah Cohen (C10), Diamond Alexander (C10), Kelly Phillips (C10), Hanshu Zhou (C10), Sarah Safranski (C9), Jim Murphy (C9), Matt Isola (C9), Nikki Cavalier (C9), Nick Balderston (C9)
Examples of similar blogs:
Chikara Inamura (HTMAA 2014), Matt Keeter (HTMAA 2011), Christos Tzamos(HTMAA 2014), Zach Seibold (HTMAA 2014), Merav Gazit (HTMAA 2014), Dorota Orlof (FAB Academy 2018 Barcelona)
Deliverable:
Write and submit a blog post for Part 1 and Part 2 on the blog you setup in Part 3. Include any media in your post that supports your thoughts and ideas. Share a link to your post on Slack #cmstudio before our next class on Sept 9.
Due: Sept 9
Week 2: Labor Day
Sept 2
Labor Day, No Class
Week 3: Idea Forge
Sept 9
- Idea Forge Tour
- We will meet at Idea Forge for class. Please arrive on time.
- Tools of Critical Making
- Assignment 1 Recap
Links from class
- The illustrated guide to a Ph.D.
- Niice
- Designspiration
- Processing
- The Coding Train
- OsiriX DICOM Viewer
- Autodesk Recap - Photogrammetry tool
- Sketchfab - 3d model sharing
- Nervous System - Kinematic Dress
- Voronoi Diagram
- Shapeways - Material Guide
- Meshlab
- Formlabs Preform - Slicing tool for Formlabs printers
- McMaster Carr - TONS OF PARTS
- Learning Fusion
- Learning Rhino
- Kurt Vonnegut on the Shapes of Stories (short version) - Thanks Derek!
- Kurt Vonnegut on the Shapes of Stories (long version)
- Meet the designer behind Four Tet's renowned light show - Thanks Steven!
- Four Tet: Looking Backward, Moving Forward
- Four Tet Set Break-down and Performance Secrets | Red Bull Music Academy
- Side Pocket: 100% Wireless Charging Travel Fanny Pack - Thanks Caro!
Assignment 2: Final Project Proposal
Create a "model" (sketch, raster, vector, 2D, 3D, render, animate, video, simulate, etc.) of a possible final project. The word "model" is meant to be understood as any kind of digital or physical representation of an idea or concept you are excited about pursuing in your course of study in critical making. Perhaps you began to identify and outline some of this concept or related areas of inquiry in Assignment 1. Also, don't worry too much about evolving your ideas as the semester progresses. It will likely happen. Think of this as a jumping off point.
Possible examples: websites, applications, objects, artifacts, products, digital-physical experiences, installations, performances, platforms, artworks, tools, machines, devices, etc. Begin to think about the various concepts, tools, and technologies associated with your other studio courses and how they may inform the development of such a project. Also think about new tools or process encountered at Idea Forge or in the variety of Tools for Critical Making.
Questions:
- What is your project concept?
- What is your motivation behind it?
- What problem are you interested in solving?
- How might you implement it?
Deliverable:
Write and submit a blog post with your project concept. Include any media and references or related work in your post that supports your thoughts and ideas. Share a link to your post on Slack #cmstudio before our next class.
Due: Sept 16
Week 4: Terminal, Intro to Web Development
Sept 16
For the next few weeks we will talk about web development paradigms and practices and you will begin to build your web development skills inside and outside of class. We will approach each topic with simplicity in mind and focus on understanding fundamental concepts. To build advanced skills with the tools we discuss you will need to dedicate time outside of class for further experimentation. We will approach topics in a hands-on workshop format so be prepared to dive in.
If you do have some web development experience coming into the program think about some new aspects of development you are curious about such as libraries, frameworks, responsiveness, interactivity, animations, Javascript, types of tech stacks, or just how you can improve your skills in what you know through practice.
The goal of the weeks ahead is to gain a sense of how you can utilize web technologies to solve problems.
Info
If you are curious about the history of electronics, computers, computer science, programming, and the Internet, check out the Histories section. I strongly advise you to start getting familiar with the various histories and technological underpinnings of the technologies you use every day. Remember, it's also about building awareness and understanding about the systems that run our world. These resources are meant to work through at your own speed and as you begin to ask deeper questions about why something works and how something works.
The World Wide Web
-
What is the World Wide Web, where did it come from, and what is its purpose?
The purpose of building websites and web applications is to make an idea accessible to one or more people.
-
How does it work?
- What is it made of?
The Industry
- What do web developers do?
- What do web developers need to know?
- How do you learn web development skills? (HINT: Practice, practice, practice)
Languages
In the resources here you can find some learning pathways for building skills with these tools. Make time to read through the basics of all the languages and try things out. Most importantly, seek to apply the skills you are learning towards projects.
Development Environment
Lets get started by setting up a development environment. The most basic things you need for any web development tasks are a text editor and a browser like Chrome, Safari, or Firefox. Other tools such as the Terminal, Git, Github, and Node.js enable you to work with all sorts of libraries and frameworks, collaborate with others, and quickly prototype new ideas. All these tools come together under the idea of running a "local development server" or localhost on your machine.
- Text Editors
- TextEdit - Default editor on MacOS
- Atom - Free editor by Github
- Visual Studio Code (VSCode) - Free editor by Microsoft. My editor of choice.
- Terminal
- How I use terminal (preferences, themes, .bash_profile, aliases, etc)
- Location on MacOS: Applications/Utilities/Terminal.app
- Learning Terminal - Cheetsheets and more!
- Github - Website that hosts git repositories. Learning how to use version control systems such as Git and Github enable many people to collaborate.
- Learning Git - A great place to start learning about Git and Github.
- Local Development Server
- There are several ways to work with a local web server. Some are simpler than others to setup and configure. For our purposes we will often use a Node.js based live-server environment, which is really just a node module (npm) running on the Node.js Javascript framework.
- Its mostly a matter of personal or project preference which local web server option you use, if any. Sometimes development is done on a remote server (ie. AWS) or a combo of local and remote.
- How to Build a Sandbox - Short tutorial showing how to setup a flexible local development environment using Node.js.
- Examples of using live-server can be found at: cm-code/live-servers.
- Chrome Browser
- Chrome Dev Tools (Inspector for debugging). Access via: View > Developer > Developer Tools within Chrome.
Terminal, Git, and Github
- Terminal
- Location on MacOS: Applications/Utilities/Terminal.app
- How do you display hidden files on MacOS? Look here
- Customize your Terminal in Terminal > Preferences. It helps to make the text larger on most screens.
- Common commands:
cd, ls, mkdir, rmdir, rm, mv, cp, pwd, man, touch. Think of all these commands as tiny applications that have no GUI. They are very old and have been around since the start of Unix based systems (Read this to learn more: Looking back at OS X's origins). Look at MacOS/Linux/Unix Command Line Cheat Sheet to see more information about common commands. - Working with directories and files:
cd <folder>- Goto into a foldercd ..- Go up one levelcd ../<folder>- Go up one level (to parent folder) and into a child foldercd ../..- Go up two levels etc- Tab completion - When you start typing in a terminal you can hit tab to complete the command if the file or folder you are going to use is available. If you hit Tab twice, you will see the contents of a folder.
- How to Setup Git
- You will likely not have Git installed on your machine. You will know if you have it or not when you type
gitinto the Terminal. You may be prompted to install XCode Developer Tools in doing so. You have two options to install git: Install the XCode Developer tools (easy way) or download the installer from git-scm. - After installing it the
gitcommand should work in the Terminal.
- You will likely not have Git installed on your machine. You will know if you have it or not when you type
- How to Use Github
- Register for an account on Github. (Stuck on choosing a username? Read this. A Tale of Github Usernames)
- Create a repo on Github. If you check the box to add a README file it will include a README.md file in the repo. This is the main information file shown when you goto the repo URL. Markdown = text file with special syntax that gets converted into HTML. Review Markdown Cheatsheet.
- Clone Repo:
git clone <repo url>. For Example,git clone git@github.com:rjduran/cm-sandbox.git. Note the URL and its use of "git" or "https". Use "https" to start. You need to go through the Github tutorial below to connect to Github via SSH. - Make some changes: (Using text editor of some kind - Atom, VSCode, TextEdit)
- Stage the changes:
git add index.html - Commit the changes:
git commit -m "my message describing changes" - Push the changes:
git push - Pro tip: After setting up your Github account, read through Connecting to Github with SSH to setup your system to connect securely to Github and not require you to enter your username and password credentials each time you push changes.
In Class Exercises
Opening files in browser
- Setup a folder and create an index.html file in it.
- Insert some html and css code and reload in browser to view the changes.
- Repeat
Using a local development server
- Setup local dev server (localhost).
- Insert some html and css code and watch the page change in browser automagically (because of live-server).
- Repeat
Deconstructing Websites
- Look at a website you think is interesting.
- Using the Chrome development tools, inspect the site. Look at the page elements, the overall structure of the html, css, and js. Get familiar with the deveelopment tools interface / console.
- If you are more comfortable in Photoshop or Illustrator, take screenshots of the website and lay them out to annotate. Put screenshots on a layer and annotations on another layer. You could even use wireframe tools or hand sketch out the structure of pages and label elements by tag.
- Start matching up the page elements with HTML tags - h1, h2, p, li, a, div, etc. (Tip: Look at W3 Schools HTML Element Reference)
Assignment 3: Intro to Web Development
The goal of this week is to get familiar with a variety of web development tools and skills. You will work with HTML/CSS to build a simple webpage, you will choose a website to deconstruct, and you will get familar with the Terminal. You should also have a basic understanding of how to use Git and Github to commit and push files to a repository and pull or clone files from a repository on Github. These aspects of development will be used throughout the rest of the class so you there will be many chances to practice.
This assignment has 3 parts:
Part 1: Setup your local development environment
We will work through some of these items in class. If you get stuck, look at the notes above, ask a neighbor, or send a message via slack. With this setup you should be able to protoype any kind of website or web app locally via live-server running in the Terminal and browser. (Hint: Work through this tutorial to complete Part 1. How to Build a Sandbox)
- Install a Text Editor
- Install Git
- Install Node.js
- Install live-server (npm)
- Open Browser and goto http://127.0.0.1:8080/
Part 2: Deconstruct a website
Choose a 1-2 pages of a website to deconstruct and analyze it to the best of your abilities. For this exercise, just focus on the HTML elements of the pages. Optional: If you want to go a step further, attempt to deconstruct the styles and javscript used in the page too. The purpose of this is to gain an understanding of what a developer does to translate web designs or wireframes into functional code.
- Utilize tools such as the Chrome development tools and an annotation method to describe the overall structure of a page.
- Annotate HTML elements with text labels over screenshots of the website, wireframes, or hand sketches.
- Embed your annotated images into your blog post with a brief writeup of your process and outcomes.
Part 3: Ode to Things
Choose one (or more) every day object(s) in your life and make a simple website for it / them. You might consider the site as a container for a favored item or collection of things, a product to sell, or simply a site that pays tribute to the item or object and what it means to you in life. This idea was inspired by the website Ode to Things, which is an e-commerce store and curated collection of physical every day products.
Example code from class: lime-cat
- Build a webpage from scratch that makes use of html elements and css selectors.
- Use necessary html elements that act as containers for different types of content and page heirarchy: text, images, video, etc.
- Develop your webpage using your local development environment setup in Part 1.
- When done, make a repository on Github for your project and commit the index.html and any media files to it. I should be able to clone your project repo and run it in a localhost on my machine to see the same result.
Deliverable:
-
A 1-2 min video screen capture demonstrating your local development environment as setup in Part 1 and your webpage built in Part 3. Embed the video into your blog post.
Tip
If you are new to screen capture tools, look into using Screencast-o-matic to document your workflow. Create an account with Youtube or Vimeo if necessary and upload your video. Note: MacOS (Mojave) has a built in screen recorder tool with key command Shift + Command + 5.
-
Include a link to your Github repo for the code written in Part 3 in your blog post.
- A brief writeup on your blog about your learning experience. What hurdles did you encounter and how did you overcome them? What worked and what didn't? What new tools did you try? How would you explain what you've done to someone that doesn't know anything about web development and the tools used?
Submit a link to your post on Slack #cmstudio before our next class.
Due: Sept 23
Resources
- History
- Stacks & Maps
- Front End, Back End, Full Stack—What Does it All Mean?
- Front-End vs Back-End vs Full-Stack on Udacity
- A Guide to Becoming a Full-Stack Developer in 2017 - If you only read one of these, read this one.
- How it feels to learn JavaScript in 2016 - Read through this and see if you can begin to make sense of the current development ecosystem. (Note: Its complex and a little bit insane but this guy makes a good (fun) read of it.)
- The 2019 Roadmap To Fullstack Web Development
- The 2019 Web Developer Roadmap - Has some great flowcharts showing how different technologies relate / Github Source.
- Git / Github
- Learning Git
- Markdown - Resources for the Markdown language used by Github README files.
- Terminal
- Learning Terminal - A learning pathway for beginners
- How to use Terminal on Mac, How to use a Terminal on Windows
- Cheat Sheets
- MacOS/Linux/Unix Command Line Cheat Sheet
- Mac Terminal Cheat Sheet
- Another Cheat Sheet
- Command Line Cheat Sheet by git-tower - This one is great for both git and terminal commands!
- How to show hidden files and folders including ~/Library on a Mac - The benefit of doing this is you can see whats actually on your machine. By default, MacOS and Windows systems hide lots of stuff. To be a master of your machine(s) you need to begin learning whats hidden just under the surface.
Week 5: Computational Thinking, Intro to Javascript
Sept 23
- Assignment 3 Review
- Terminal Questions
- Git/Github Questions
- What are the steps to working with a git repo local or remote? (Hint: Look at the Github notes from last week.)
Web Development Review
-
Web Development Learning Pathways
- Learning HTML & CSS
- Learning Javascript
- W3 How-To Examples - A great set of how-to examples for various web topics.
-
What are the primary development file types and what do they do?
- HTML = Document Structure
- CSS = Visual Identity
-
JS = Interactivity
At a basic level all you need is a single index.html file to render a webpage. All the CSS and JS you may have can exist inside the same file embedded within
<style>...</style>and<script>...</script>elements. It only becomes important to separate the 3 types of code when a project becomes too large to manage within a single file. Best practices, modularity, and the need for regular maintenance have led developers towards a current approach of establishing and using style guides or coding standards.
-
What are CSS selectors and how do they relate to HTML elements?
- What is the difference between embedded and linked CSS and how do you use both types?
Notable examples of Front-End development
- General Assembly Web Projects Gallery - A repository of basic web projects by GA students.
- Daily CSS Design - Fun, interactive, and visually interesting uses of CSS and JS.
- Front-End Case Studies - A great collection of case studies about front-end development tools and practices across industry.
- codepen.io - Code sharing website for a variety of Front-End functionality. This is a basic sandbox environment to easily experiment with code.
Computational Thinking
Computational thinking is the thought process involved in formulating a problem and expressing its solution(s) in such a way that a computer—human or machine—can effectively carry out. (Wikipedia)
Q: How does one think like a programmer or computer scientist?
- How to think like a programmer — lessons in problem solving
- Understand the problem and describe it simply
- Plan out how to tackle it (ie. pseudocode)
- Divide the problem into smaller pieces
- Stuck? Research alternatives, Reassess possibilities, Debug.
- Exploring Computational Thinking by Google - Read this overview.
- How can I learn to think like a computer programmer? - Read through the first response.
- What is Pseudocode? - TLDW; It's logic written out in plain english that you then translate into the programming language of choice.
- Blockly - A visual programming framework based on the famous Scratch project by the Lifelong Kindergarden group at the MIT Media Lab.
Q: How can I get better at programming / thinking / making / problem solving this way?
- The short and honest answer is that it takes lots of practice. Look to solve as many problems as you can using programming (and in the process practice computational thinking).
- It takes an interest and willingness to jump into new tools and code on the regular. Try out as many different languages, libraries and frameworks as you can that address the problems of interest.
- Read books. Read / work through tutorials and examples. Watch videos. Solve problems. Think about what kind of learner you are and how you navigate resources when learning new skills. Start with the resources in Learning Javascript.
Related to the above discussion about programming and such, here are a few things to read if you are concerned with needing to have a strong background in math to accomplish anything with Javascript or another programming language. I hope this also addresses the question of "What amount and kind of math would you need to use to improve as a programmer?" And I use the word "improve" because its a practice like other forms of making and creativity. Which takes time to practice and master.
- You Don't Have to Be Good at Math to Learn to Code
- Learning to code: do I need to be good at maths?
- "How much math do I need to know to program?"" Not That Much, Actually.
- Does Math Help Programming Or Programming Help Math?
Intro to Javascript
JavaScript is a programming language for the web. It makes things dynamic, interactive, and fun!
Question: When should Javascript be used?
I hope some of these articles begin to paint the picture of why and when you would use Javascript.
- You Know You Should Use JavaScript When…
- The Five Top Reasons to Use JavaScript
- When do developers use JavaScript and why?
- Choosing Programming Languages: The Right Tool For The Job (C#, Python, Node.js)
Question: How to use JS with HTML / CSS?
- Put it inside a
<script>tag within the<head>tag inside your index.html file.- Placement in
<head>tag vs the end of<body>tag.
- Placement in
- Embedded vs Linked (ie. JS code inside a script tag or in a linked script.js file).
- Linked:
<script type="text/javascript" src="script.js"></script>
- Linked:
Question: How can I work interactively with JS and within the browser?
- The best way to start experimenting with JS is to play with it in an sandbox or local development environment, like what you setup last week using the live-server npm module.
- Chrome Developer Tools > Console and
console.log()are your best friend when debugging JS code. Think of this statement as a way to put your code and the way it functions under the microscope when the browser runs it. - How To Use the JavaScript Developer Console - A great intro tutorial explaining how and why to use the console.
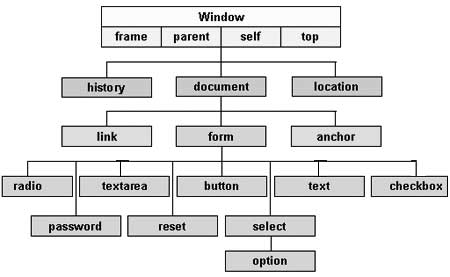
The DOM is a standard object model and programming interface created by the browser when a webpage is loaded. It is essentially your HTML page but in a different format now accessible through a browser based programming interface and language (Javascript). In general, JS can manipulate (get, change, add, delete) any part of the DOM (ie. any part of a page or document).
- Here's a great image of the DOM
- DOM Tree Visualization Example on CodePen
- Try opening the Chrome Developer Console and typing
documentorwindow. What does it return? How does it relate to the DOM image above?
- Try opening the Chrome Developer Console and typing
- JavaScript DOM Tutorial Series (Video Playlist) - A great series of videos introducing the DOM and how to manipulate it with Javascript. It totals 2 hrs in duration but is extremely helpful to understand some aspects of the Javascript language and how it can be used.
- Eloquent Javascript: CH 14 - The Document Object Model
Some things you can use JS for:
- Change / Remove HTML elements in the DOM / on the page
- Change and add CSS styles to elements
- Read and change element attributes (href, src, alt, and more)
- Create new HTML elements and insert them into the DOM / page
- Attach event listeners to elements (click, keypress, submit)
- Send/Request data to/from an API
Language Fundamentals
Javascript is a programming language that while it has an abundance of learning resources freely available on the web it still takes years to master for most people. Try not to feel discouraged since you are likely new to programming and understanding the various aspects of web development.
As with most programming languages and tools for building the web, always start by seeking out documentation and resources on the subject. I have several books listed in the Learning JS section. Most of them are good entry points. Additionally, every programming language that is widely used will have some kind of language reference with examples of how to use it. Many can be copied and pasted into the console or script to run. Below are some resources pointing at aspects of the Javascript language.
Language Overviews
- Javascript for Cats is an entertaining overview that covers the most important parts of the language.
- Javascript Basics (p5.js wiki) is a quick-ish overview of the language and how to use it with or without p5.js.
Language References
- Mozilla Javascript Reference
- Variables
- Numbers
- Operators
- Booleans
- Strings
- Conditionals
- Loops
- Functions
- Arrays
- Strings
- Objects
- JSON
Events & Event Listeners
- How to work with events - Element changes, Key presses, Mouse movements
- Events and the DOM
- JS Timing Events - Learn more here about how to make events that trigger in time.
Assignment 4: JS in Action
The goal of this week is to gain a better understanding of Javascript by researching uses that interest you and by experimentation with the developer console. Part 1 is required but Part 2 is optional. I highly encourage you to work through part 2 because it will further your understanding of how to work with the language in the browser.
This assignment has 2 parts:
Part 1: JS Examples
Research 2-3 examples of Javascript in action. Look at the resources above and investigate uses of JS that interest you. Try to identify what the JS is doing behaviorally when you interact with it or by observing its dynamic behavior in a page. Attempt to identify libraries (if any) that are used to build the functionality you see and interact with.
Javascript is so versatile that at times it might be difficult to decipher from simply looking at the behavior in the browser. You have to dig into the Developer Tools and inspect beyond the page elements and into the files that are being downloaded from the server (Hint: Look in the Network tab within the Developer Tools).
List of JS Examples (Added on 4 Oct 2019)
- High Rise
- Ultra Noir - Nouvelle Vague
- Histography
- St Louis Browns
- Raoul Gaillard
- IBM Design
- Andeinerseite
- React Tutorial: Tic-Tac-Toe
- Clayton Tic-Tac-Toe App
- Clayton Name Rotate Homepage
- NYT All Birds
- Codepen
- Wellcure
- BBC: Real Happiness Project
- Drawmote
- Frere Jones
- Starbucks Creative Expression
- Travel Visa Inequality
- World Migration Map - Info
- Cup Noodle
- Leg Work Studio
- Multeor
- Masi Tupungato
- Pocketnet
- Brooks Running
- WWOOF
- Weave Silk
- The Boat
- Debbie Millman
Part 2: Experiment with the DOM (Optional)
Work through the resources and exercises below to gain familiarity with the developer console and the Document Object Model (DOM).
To get started:
- Clone cm-javascripting and start up a live-server in the "starter" directory. With live-server running, open the Chrome Developer tools Console and enter:
document. You will get a representation of the entire HTML document as an object. The document object is the top level object in the DOM. - Read through this list of Properties and Methods for the document object and to understand what you can see in the console. Use this as a reference for the following challenges.
- Watch the videos 1-5 in this tutorial series to get a sense of how to complete the following challenges.
Console Basics:
Tip: As you type code into the developer console be careful not to reload the page or you will wipe out what is in the console. To keep a backup of the Javascript entered just make a temporary .txt or .js file and copy and paste your code.
You can follow along in this video for console basics.
- Open the Developer Console and type
document. - Define an integer variable:
var a = 1; - Define a string variable:
var name = "Your Name"; - Define an array that stores numbers: 1,3,5,7,9
- Define a function called "helloWorld" that prints "Hello World" to the console when called.
- Defing a function called "printName" that prints out your name when called;
- Define a function that prints any name entered as parameter when called. What happens when you overwrite an existing function?
DOM Basics:
Getting Elements
- Get a reference to all the paragraph (p) tags in the document.
Hint: Look atgetElementsByTagName() - Get a reference to a paragraph tag with a specific id of "second".
Hint: Look atgetElementById() - Get a reference to a all paragraph tags with a class of "first".
Hint: Look atgetElementsByClassName() - Get a reference to an element or elements within another element. For example, if you have an unordered list (ul) with several list items (li), how do you select a specific li and display it's contents to the console?
- Change the active color of the sidebar to red.
Changing Elements
- Change the text within a sidebar list item (li) to "Foo". Change the text within the previously selected list item (li) to "Greetings List Item! I'm a string from another planet!".
- Change the text of a specific paragraph to a different string of text. Use an Ipsum generator tool to create new placeholder text that you insert using Javascript.
Removing Elements
- Clear the contents of the paragraph with an id of "empty-me".
- Clear the contents of the set of paragraphs with class "empty-us".
- Remove the div with a specific id of "section3".
Adding Elements
- Create a new anchor tag that links to your blog and insert it just after the paragraph tag in the div with an id of "about".
- Append a new div anywhere in the document and give it an id of your choice. Insert a paragraph with some content into the div using javascript.
- Add a new list item to the sidebar ul that links to your new div so you can click and scroll to it.
- Add a new list item with URL to www.google.com in the sidebar.
Event Listeners
- Make an event listener for any h2 element that triggers an
alert()when you click it. Set the alert message to "Hey Hey Hey!". - Make an event listener that triggers a change in the text of a specific paragraph with the id "change-me".
Deliverable:
- A 1-2 min video screen capture showing the examples you researched in Part 1. Talk about how the examples work from the perspective of user exeprience and design. What need is being met by using JS in this context? Embed the video into your blog post.
- (Optional) If you worked through Part 2, demonstrate some of your workflow in the developer console and describe what's going on. Include this portion in your video.
- (Optional) Create a github repo for this assignment called "cm1-a4-javascripting" to document the code you created for Part 2. Include a link to your repo for the code written in your blog post. Look at some Markdown resources for writing a good README for your Github project if you haven't used the Markdown language yet.
- A brief writeup on your blog about your learning experience. What hurdles did you encounter and how did you overcome them? What worked and what didn't? What new tools did you try? How would you explain what you've done to someone that doesn't know anything about web development and the tools used?
Submit a link to your post on Slack #cmstudio before our next class.
Due: Sept 30
Week 6: Web Libraries, Frameworks, and Applications
Sept 30
- Assignment 4 Recap
- Fun things I found
- Questions on anything
- Coming Up
- Next week: Intro to Arduino Workshop
- Week after: Work session
- Great resources
- Programming Terminology - A Wikipedia for Programming, Computer Science, and Much More. Don't know a term? Look here.
- Eloquent Javascript - This is a great free book to learn more about JS language fundamentals.
Web Applications
- Whats a web app?
- What is a static website?
- What is a native or mobile app?
- What is a Progressive Web App (PWA)?
- Short Answer: It's a responsive mobile website that mimics the behavior of native or mobile apps.
- 11 Examples of Progressive Web Apps
- A simple progressive web app tutorial
- Your First Progressive Web App - Introductory tutorial from Google on PWAs.
If you are interested in learning more about the architecture of different types of web apps, check out this article - Web Application Architecture.
Also, its worth investigating alternative workflows for building mobile oriented applications with less coding. There is no endgame tool or workflow out there at this time but many are trying to bridge the gap between design and development. Here's a quick overview article about some options - The Best Low- and No-Code Mobile App Development Platforms.
Library
A library is a collection of code containing objects, functions, and methods that you can use in an application or project.
Fonts
Animation / UI Design
- Animate.css
- WickedCSS
- Our 100 Favorite CSS Libraries, Frameworks and Tools for 2019
- Top 9 Animation Libraries
- Easing Functions Cheat Sheet
- The web design process: creating the visual design
- CSSDB - A curated collection of great CSS, Sass, LESS and Stylus libraries.
JS / DOM
- jQuery - Library for simplifying front-end / client-side Javascript.
- Flapper
- Draggable.js - A fun JS library we found during class that makes dragging things fun.
Creative Coding
- p5.js - Library for creating 2D/3D interactive browser based experiences.
- D3.js - Data Visualization Library
- Three.js - Three.js is a cross-browser JavaScript library and Application Programming Interface used to create and display animated 3D computer graphics in a web browser. Three.js uses WebGL.
- A-Frame - A web framework for building virtual reality experiences. Uses Three.js under the hood.
- chrome experiments - Various JS libraries and experiments built with JS
Framework
A framework can be everything you use in application development. It can be a library, a collection of many libraries, a collection of scripts, or any piece of software you need to create your application. Framework is just a very vague term. It's best to think about a framework as something that is mostly ready to use out of the box. Just add content and configure it to work.
- Bootstrap - Front-End CSS/JS Library/Framework
- Express - Node.js Web Application Framework
- Keystone.js - Node.js based CMS built on Express and MongoDB
- Strapi - Headless CMS / API Development Tool
- Primer - Github's Design System
Discussion: Library vs Framework
The Future?
Components, Cross Platform App Frameworks, Magic and Sourcery, etc
- React
- Ionic Framework
- Electron Framework - Build cross platform desktop apps with JavaScript, HTML, and CSS. This is what Slack, VSCode, and many more apps are built with.
- Google Material Design: Components
- Flutter
- Templating Engines / Languages
References
- JS Datatypes
- JS/jQuery Events
- Arrays
- Objects
- Data Type: Objects
- Debugging: Using typeof.
typeof "a string" - Objects Quick Reference
- JavaScript Object Notation (JSON) - A syntax for storing and exchanging data.
- Javascript Built-In Object Reference
- Eloquent Javascript - This is a great book to learn more about the language and how to use Objects.
- JSON
Assignment 5: Digital Legos
The goal of this week is to make something using one or more CSS and/or JS libraries or frameworks.
Choose from the list above or locate something else and explore it. My suggestion for exploring something visual / dynamic / interactive is to start with P5.js. If you want to dig deeper into making something more practical as a website experience with common UI elements then look into jQuery and jQueryUI and Bootstrap to start. If you are feeling like you want to delve into the world of Node.js, Three.js, or AFrame, check out the resources on the left sidebar.
Thoughts on getting started:
- If you have a web based project in mind for your final project or another project, begin to identify what tools you might use to build that project and attempt to work on a piece of it.
- What functionalites does the project need? (Maybe there's a library for it)
- How do you see the project working from the user experience?
- What design elements can you identify and how might they be coded?
- Make a list of questions you have about the interactive and/or dynamic behaviour observed on websites you have visited and are inspired by.
- What's intriguing to you about the websites and how they work?
- Investigate libraries that seem interesting to you. Assess their capabilities and how you can apply it to a project.
- Try to be as specific as possible when invesitgating a library or framework. What is your motivation for learning it and what do you want to accomplish with it? Identify some specific uses of it and focus.
- Start simple. Dont try to understand it all. If you copy and paste code from somewhere, copy one line at a time and learn what it does. Then add more code and repeat. It's easier to start simply and build up complex functionlaity than to work the other way.
- Look for "getting started" documentation about a library or framework. Work through it and see where it takes you. Google is your best friend.
- Use comments (in JS, HTML, or CSS) to write notes to yourself.
- Work together! Share code, ideas, and libraries you find with eachother.
- Have fun with it!
Deliverable:
- A 1-2 min video screen capture showing what you made. Talk about the libraries you experimented with, what you learned, and what your goals were. Embed the video into your blog post.
- Create a github repo for this assignment to document the code you created. Include a link to your repo for the code written in your blog post. Look at some Markdown resources for writing a good README for your Github project if you haven't used the Markdown language yet.
- A brief writeup on your blog about your learning experience. What hurdles did you encounter and how did you overcome them? What worked and what didn't? What new tools did you try? How would you explain what you've done to someone that doesn't know anything about web development and the tools used?
Submit a link to your post on Slack #cmstudio before our next class.
Due: Oct 7
Week 7: Intro to Physical Computing, Intro to Arduino
Oct 7
- Assignment 5 Share
- JavaScript is not Java, but you will be using a language similar to Java called C++. This term is synonymous with "Arduino" since its the programming language used.
- We're moving on to look at electronics, hardware, and looking at how we design interactive systems with it.
What is Physical Computing?
Physical Computing is an approach to computer-human interaction design that starts by considering how humans express themselves physically. Computer interface design instruction often takes the computer hardware for given — namely, that there is a keyboard, a screen, speakers, and a mouse or trackpad or touchscreen — and concentrates on teaching the software necessary to design within those boundaries. In physical computing, we take the human body and its capabilities as the starting point, and attempt to design interfaces, both software and hardware, that can sense and respond to what humans can physically do.
This means that we have to learn how a computer converts the changes in energy given off by our bodies, in the form of heat, light, sound, and so forth, into changing electronic signals that it can be read and interpreted by computers. In physical computing, this is accomplished by connecting sensors to the simplest of computers, called microcontrollers, in order to read these changes and interpret them as actions. Within the microcontroller, custom software acts as the behaviour or control logic driving a variety of digital and physical outputs such as graphics, light, motion, and sound.
Source 1: Adapted from "What is Physical Computing?" by Tom Igoe (ITP, NYU)
Source 2: Intro to Physical Computing Slides by Danny Rozin (ITP, NYU)
First, some fun examples...
There's no lack of interesting projects out there at this time (2019). The field of physical computing has been evolving since the introduction of the Arduino in 2005.
- Circula
- WePlug
- Dripping Machine for Ceramics
- Minimalist Greeting Robot
- Rot Bot
- Pacman Costumes
- Face Trade
Arduino (what? why?)
Arduino is an open-source hardware and software platform for building digital devices and interactive objects that can sense and control objects in the physical and digital world.
Inputs (Sensors) -> Behavior (Software) -> Outputs (Action)
You can think about this type of device (microcontroller) as the interface between the physical and digital world. It allows you to translate physical phenomena into digital information and act upon it with software (code) to produce a kind of digital or physical output such as flashing a light or turning a motor. The Arduino and connected devices can be thought of as hardware "LEGOS" or building blocks to construct complex electro-mechanical, interactive, and responsive systems.
Basic Electronics and Hardware
Tools of the Trade
- Microcontrollers (Arduino UNO, Mini, Nano 33 IoT, etc)
- Breadboards, Hook up wires
- Input/Output Devices - Sensors and Actuators
- Sensor Kits: Elegoo 37-to-1 Sensor Kit V2.0, 37-to-1 Sensors Kit Explained
- Circuit Diagrams & Schematics
- A circuit diagram, block diagram, or flowchart are ways of describing or communicating the coneectivity and functionality of an electrical device or system.
- Example: Arduino Uno Schematic, Breadboard vs Schematic
Arduino Boards
- Official Arduino Boards
- There are many different shapes and sizes of Arduino's available, how do you choose hardware for a project?
- Look for a guide such as the Arduino Comparison Guide by Sparkfun to start.
- Decide what your project will do and what inputs and outputs it has. Also take into consideration how you plan to use the Arduino.
- Does it use data from the physical world?
- Does it need to display information?
- Do you need all the features available in the board or can you get away with a smaller/cheaper/less capable one?
- How much do you have to spend on the project? Look at the cost of supplies. Luckily most Arduinos are cheap but components and devices can add up.
Software
- Arduino IDE - Download and Install.
- Arduino Language Reference
- Serial Monitor (for monitoring board input and output) - Tools > Serial Monitor
- Built In Examples
- Blink - Uses a LED
- Button - Uses a Button
- AnalogReadSerial - Uses a Knob
- AnalogInOutSerial - Uses a Knob to dim LED with Pulse Width Modulation (PWM)
- Sweep - Uses a small servo motor
- Knob - Uses a small servo motor and knob
- RJ's Examples (cm-arduino, Video of examples running in hardware)
- RGB_LED_01 - Fade RGB LED up and and down with Red color
- RGB_LED_02 - Cycles through colors with 1 sec delay for each
- RGB_LED_03 - Adjust RGB colors / brightness with potentiometers
- Arduino_to_Processing - via Serial Communication
- Processing_to_Arduino - via Serial Communication
- Autodesk TinkerCAD Circuit Simulator - A great tool for simulating the behaviour of circuits without the hardware.
Input & Output Devices
- Arduino Inputs - Great overview of Inputs, Sensors, and Applications.
- Arduino Outputs - Great overview of Outputs and Applications.
- Instructables Arduino Class: Input/Ouput - A great guide to input and output devices in both hardware and simulation via TinkerCAD Circuits. Highly recommend if you need more practice with Arduino basics and don't have all the hardware at hand.
Input Devices
- Potentiometer - AKA "Variable Resistor" AKA Knob
- Trimpot (Knob)
- Joystick (Playstation Joystick)
- Slide Pot (Slider)
- Buttons / Switches
- Light Sensor (Photoresistor)
- Distance / Motion / Proximity
- Accelerometer
- Temperature
- & Many More!
Output Devices
- Light Emitting Diodes (LEDs)
- RGB LEDs
- Single/Multiple LEDs
- LCD Display
- Motors
- Motors and Selecting the Right One
- Servo Motors
- If you are interested in motors, start with trying to hook up and program a servo motor.
- Adafruit Lesson 14. Servo Motors
- Hobby Servo Tutorial
- Sparkfun Servo - Generic High Torque Continuous Rotation (Standard Size)
- How to use Servo (TinkerCAD Circuits Simulator)
- Stepper Motors
- Relays
- A relay allows you to control high power AC devices such as a lamp or power strip with a low power digital device / microcontroller such as an Arduino or Raspberry Pi.
- Beefcake Relay Kit / Assembly Instructions
- Relay Shield v2.0 / Assembly Instructions
- Cthulhu Shield - An open source sensory substitution/sensory augmentation development platform for Arduino. Basically, this device allos you to interact with electronics using your toungue. What?!
More Project Examples
- hardwareux - A great instagram account showcasing projects built with hardware.
- Creative Applications (tag: arduino)
- Stringent, the $15 Wall Plotter
- SVA Fundamentals of Physical Computing Projects Archive
- Arduino Based Projects - Start here for project inspiration.
- The importance of hardware-software integration — designing the Withings scales
- 5 Things UX Designers Need to Know About Designing Wearables
- Little Sun
- 8x8 LED Cube - Good open-source implementation of this concept. YT Video
Unconventional Switches
What is a switch? What can it be?
Resources
- Learning Basic Electronics
- Learning Arduino
- Arduino Prototyping Techniques
- Tim Rodenbroeker - Input / Output Map
- Physical Computing Books
Assignment 6: Designing for Interactivity
Design an interactive project using at least 1 input device such as a button or knob and at least 1 output device such as a single color LED or RGB LED. Explore creative uses of the input and out device(s) you choose to work with.
From class we know that buttons cause some kind of action to happen. What’s the action you wish to design for? We also know that LEDs are a common response from systems that need to communicate its status, its state, or its mode of operation -- they are used to signal us in some way. They are used in many situations to tell us something through color, brightness, pulsing, state changes, and light. What will your system communicate through the use of an LED as an output device?
Some examples / use cases to build from:
- Timers - push a button, start timer on screen or visible through changing LED colors
- Alarms - push button, set alarm, turn on LED when time is up
- Light Sequence - push a button or initiate a sequence of events, begin light sequence(s)
You are welcome to explore other input and output devices such as environmental sensors (temperature, etc), servo motors, and relays to create a project with more functionality if you wish. You may also explore the use of the Processing environment as an output device or input device. Examples of this could be to change the color of a Processing sketch in response to a physical button press or knob turning plugged into an Arduino or an LED changing color in response to a set of swatch colors being chosen in a Processing sketch. To look at how serial communication works in this way you will want to investigate the examples shown under the Arduino + Processing section in the cm-arduino repo.
Some common interactions with input/output devices:
- Press Button (Physical) -> Arduino -> Flash RGB LED Red (Physical)
- Occlude Photoresistor (Physical) -> Arduino -> Print value to Serial Port (Digital)
- Turn Potentiometer (Knob) (Physical) -> Arduino -> Display value on LCD Display (Physical)
- Press Button (Physical) -> Arduino -> Send Data on USB (Serial Port) -> Receive Data in Processing Sketch (Digital)
Thoughts on getting started:
- Start by building understanding of the 4 built-in examples - Blink, Button, AnalogReadSerial, and AnalogInOutSerial. These 4 examples are the building blocks of many kinds of projects. Each example has pictures of how to build the circuit. Replicate the circuit exactly as you see it and read the notes for each to understand more about it.
- Next move on to understanding how the examples in cm-arduino work starting with RGB_LED_01. Here's a video of the examples hooked up and working.
- Dont try to go too far too fast. Take your time to connect wires to the correct locations on a bread board. You will likely need to hook circuits up a few times to get something working.
- Make sure you upload the correct Arduino sketch. The board you use may contain a previous sketch in memory when you first start to use it. Its good practice to "reflash" the Arduino with an empty sketch just to be sure it's not running another program that could cause issues with hardware you are wiring up.
- If you encounter what seems like a hardware issue or strange behavior, you might have something hooked up incorrectly or maybe even missing a connection. Double check the circuit diagram and retrace your steps.
- Work together!
- Have fun with it!
Deliverables:
-
A 2-3 min video showing what you made.
- Include recorded video of your hardware working as designed and screen shots or photos of specific moments of interest you encounter and wish to communicate in the project development.
- Talk about the types of input and output devices used, interactions you designed for, what you learned, and what your goals were.
- Embed the video into your blog post.
-
Draw a circuit diagram of your project using Fritzing and insert it into your blog post. Note: This tool is used to make the circuit diagrams shown on every Arduino example page.
- Create a github repo for this assignment to document the code you created. If you built something that makes use of both Arduino and Processing be sure to include folders for both types of sketches. Include a link to your repo for the code written in your blog post.
- A brief writeup on your blog about your learning experience. What hurdles did you encounter and how did you overcome them? What worked and what didn't? What new tools did you try? How would you explain what you've done to someone that doesn't know anything about physical computing and the tools used?
Submit a link to your post on Slack #cmstudio before our next class.
Due: Oct 14
Week 8: Connected Devices, Intro to Raspberry Pi
Oct 14
- Assignment 6 Share
- Books: Code, Electronics, Computers
- Code: The Hidden Language of Computer Hardware and Software - A great introduction to code, computers, electronics and how they work together to shape the computational landscape we inhabit.
- 100 Interactive Projects - Fun collection of projects using various digital and physical tools such as TouchDesigner, Arduino, Processing, P5.js, and more.
Intro to Raspberry Pi
A Raspberry Pi is a fully functional single-board computer capable of running various Linux distributions (aka Operating Systems). It's used for all kinds of IoT / connected physical computing applications where internet connectivity, bluetooth, HDMI, audio, or more advanced hardware is required.
What does that mean? Well, its a small computer that fits in your pocket that can be programmed in almost any language, powered by almost any power source, and used in a variety of applications. If you care to learn more about its history and where it gots it's name, read this Quora thread.
"The "Raspberry" derives is an homage to early computer companies being named after fruit, like Apple, Tangerine Computer Systems, Apricot Computers, and Acorn (which inspired the microcomputer’s design). The "Pi" derives from the original idea to make a small computer to run only the Python programming language."
Here are a few examples of what you might do with a Raspberry Pi:
- Web Server
- Kiosk
- Budget computer running many different flavors of Linux
- Media Server (Similar to Apple TV, Roku) - OSMC
- File Server
- IoT / Home Automation / Physical Computing
- WiFi Router / Access Point
- Custom VPN
- Retro Gaming System - retropi
- Photo Booth
- Time Lapse Camera System
- Internet Radio Device - Mopidy
- DIY Alexa Device (Look at links below)
- Programming / Education (This is where it all started of course!)
- Robots!
- Digital Art Display - openframe
- DIY Laptop - pi-top, (pi-top on Adafruit)
- DIY Synths - Google NSynth, Zynthian
- Live coding tool for creating music with code - Sonic Pi
- BitBarista
- Evil Fruit Bowl - Honorable mention with it being October and all.
So...How is this different from an Arduino?
There are so many differences and many similarities but ultimately it comes down to understanding what each type of board is (how we classify it), what it is good and bad at (pros and cons), and what it offers given the parameters of a project. I also like this human based analogy from a user in the Quora thread - "What are the differences between Arduino and Raspberry Pi?".
Arduino is like the spinal cord. It connects to a large number of peripherals and provides spontaneous communication. Good for low-intelligence tasks.
Raspberry Pi is like the brain. Its primary advantage comes in processing higher level processing capability.
Arduino => Microcontroller
Raspberry Pi => Microcomputer (single-board microcomputer)
Ways of comparring devices to answer questions:
- There are so many types (Ver 3, Ver 4, Zero W, A+, etc. ), which to choose?
- What are the differences? Why use one over another? Pros/Cons?
-
What are the technical differences? My idea requires a fast device but few GPIOs or many GPIOs..
-
Compare specs
- Compare similar devices / platforms
- Raspberry Pi and Arduino: What's the Difference and Which Is Best for Your Project?
- Arduino Vs. Raspberry Pi: Which Board Is Best?
- Arduino Comparrison Guide (Sparkfun)
- IoT Hardware Guide
- IoT Platforms Overview: Arduino, Raspberry Pi, Intel Galileo And Others
- Patnaikuni, Dinkar R Patnaik. A Comparative Study of Arduino, Raspberry Pi and ESP8266 as IoT Development Board (pdf)
- Investigate alternatives
- Build a toolkit of various types of boards and test them.
- Research different types of projects and approaches to working with different kinds of devices.
- Make something and see if it works like you think it will.
More Projects
- Make a web frame with Raspberry Pi in 30 minutes
- Magic Mirror - Original source code for the Mirror in the studio. Want to make your own version?
- Octoprint - 3D printer cell management tool
- DIY Alexa Enabled Device
- Project Alias / Fast Company Press
- Dronebot Workshop - Great resource for various in depth tutorials.
- Ball Balancing PID System - Intriguing project all around.
- MagPi Magazine / 50 Great Projects w/ Raspberry Pi
- 4 Amazing Raspberry Pi Synthesizer Projects
- Top 20 Best Raspberry Pi Projects That You Can Start Right Now
- The Internet as Material: Empowering the Next Phase of Connected Hardware Innovation - Ayah Bdeir - Solid 2014 / Little Bits - A great talk about empowerment through access to electornics by the creator of LittleBits.
- NODE (n-o-d-e) - Repository of projects spaning decentralization, P2P, AI, hardware design, and research and technology. Many projects use the Raspberry Pi.
How to Setup Raspberry Pi
Tools needed:
- Raspberry Pi (3, 4, or Zero W)
- microSD card (You will need a SD card adapter and dongle to plug in the SD card adapter)
- The Raspberry Pi Operating System (Raspbian Buster)
- Micro-USB Power Supply
- HDMI Monitor (Optional*)
- Keyboard & Mouse (Optional)
- Node.js, NPM, Git
- WiFi Connection
- Ability copy files to/from the device using SSH (SCP) or Cyberduck (FTP)
- *Note: Raspberry Pi Zero W requires dongles to connect HDMI and USB)
Process:
The following are the basic steps for setting up a Raspberry Pi device in most situations. For a more detailed and in depth tutorial read through the steps in the Raspberry Pi Setup Tutorial.
- Download Raspbian Buster
- Flash the microSD card using balenaEtcher
- Setup and configure system (Connect to WiFi, etc).
- SSH into device from laptop (Or optionally use external display, mouse, and keyboard).
- Install Node.js on device. Git is already installed by default with Raspbian Buster Desktop version but not with the Lite version.
- Clone cm-webserver git repo with Node.js webserver example based on W3 RasPi Websockets Example.
- Start the server on the device. Here's a video of this part of the process
- cd into directory
cd cm-webserver - Start server.
node server.js - Access webpage in browser on laptop using IP address and port of device. For example,
http://192.168.0.25:8080. Note This "server" will run for the time you have your terminal window open.
References
- Raspberry Pi Setup Tutorial
- Raspberry Pi CLI Command List
- How to Access Device Without Monitor or Keyboard
- Learning Raspberry Pi
- PM2 - Node.js process manager to run apps without being connected (via ssh) to the system running the process.
Assignment 7: Strange Computers
Reviewing the landscape of increasingly accessible electronics, the hardware building blocks (input and output devices) of complex interactions, and strange little computers known as microcontrollers, we find ourselves now engaging with the single-board micro-computer known as the Raspberry Pi.
The task this week is to dive into the world of single-board micro-computers by making something with the Raspberry Pi. "With" being the keyword here. You could take it to mean "build a system with the device as the platform running code to perform some action" similar to working with an Arduino or you might consider just using the Raspberry Pi environment to try out a new piece of software running on it and have the goal of making something using the built-in tools available. Tools such as Mathematica or Sonic-Pi come preinstalled on the full desktop version of Raspbian. You might even consider exploring an alternative operating system or "disk image" that does something more specialized out of the box like retropi or openframe.
Ways to engage:
- You are welcome to approach this weeks assignment solo or with a partner. I recommend working together regardless. It's a great way to troubleshoot / motivate / question / learn.
- If you dont know where to start, begin by making a list of questions about possible uses of the technology that matter to you. In what ways will you engage with it? What's clear about it? Whats confusing about it? What do you know about it? Whats mysterious? What's its purpose? Why use it? Then attempt to answer those questions.
- Make a map. Similar to what I shared in class, make a map to tease out some understanding about the technology and it's place in the world. Where do you engage with it? For what purpose? To what end or final cause?
- If you found some success using Arduino's and input/output devices, and feel confident enough trying out another platform in this way, consider working through some tutorials about how to make the Raspberry Pi perform similar tasks. Then look at what else it can do that's different from an Arduino. Start simple just as you would on an Arduino. For example, here's a tutorial on a Blink example similar to Blink on Arduino.
- Focus on a feature. For example, make something that uses bluetooth functionality for connectivity and sharing data. Bluetooth speakers, headphones, and smart devices all use bluetooth to share data.
- If you are interested in the deployment of this device as a webserver providing static content and/or connected to hardware, check out the W3 tutorial on Node.js and Raspberry Pi.
- Look at projects and tutorials!! Use the resources above and the Google machine to find some projects or tutorials that interest you. Follow them and identify what works and what doesn't. What's intriguing about it? How easy or difficult is the project to build? How easy are the instructions to follow? What if you were to write up or document your project in a similar way? How would you do it?
- Working with this tool may require learning something about new programming languages to realize an idea or run a bit of code someone previously made open-source. Try it out and see what happens. Locate a good resource (book, website, series of tutorials) to learn enough of the programming language to understand how to run the code. Something working thw wrong way is better than nothing always.
Ways of connecting to and use a Raspberry Pi device:
- By connecting up a display, mouse, and keybaord to the Pi USB ports. This is by far the easiest but requires the peripherials.
- In the terminal via SSH and ip address. For example,
ssh pi@192.168.0.25. This is the command line interface (CLI) approach. Be sure to use with your correct IP address for the device. - Using a desktop VNC tool to see the desktop environment of Raspbian running on the Pi. For example, VNC Viewer.
- To transfer files back and forth on any connected device you can use an FTP/SFTP tool like Cyberduck or the built in command line tools such as scp in terminal.
Deliverables:
-
A 2-3 min video showing what you made.
- Include recorded video, screen capture, images, audio, or graphics of your explorations working. Include screen shots or photos of specific moments of interest you encounter and wish to communicate in the project development.
- Consider adding more details to your videos by talking over the clips, adding music or sound, and using labels or callouts to increase production quality.
- Talk about the types of tools and software used, input and output devices used, interactions or behaviours you designed for, what you learned, and what your goals of the project were.
- Embed the video into your blog post.
-
(Optional) If needed, draw a circuit diagram of your project using Fritzing and insert it into your blog post.
- (Optional) Create a github repo for any code used in this assignment. Include a link to your repo for the code written in your blog post.
- A brief writeup on your blog about your learning experience. What hurdles did you encounter and how did you overcome them? What worked and what didn't? What new tools did you try? How would you explain what you've done to someone that doesn't know anything about the Raspberry pi?
Submit a link to your post on Slack #cmstudio before our next class.
Due: Oct 21
Week 9: Digital Design & Fabrication / Intro to Fusion 360
Oct 21
- Assignment 7 Share
- Idea Forge
- From CAD to CAM! This is our trajectory for the next 3 weeks.
Digital Design (aka CAD)
- A short history of sketching and blueprints. What happened before computers? Vintage Photos: Life Before AutoCAD
- What is CAD and why do we use it to make things?
- What kinds of things are possible with CAD? (Hint: Look around. What do you see? Almost everything in our human built environment is made using an industrialized CAD/CAM process.)
CAD Tools
- 2D - Adobe Illustrator, Photoshop, etc
- 3D - Fusion 360, Autocad, Inventor, Solidworks, Rhino, etc
Digital Fabrication (aka CAM)
Digital fabrication is a type of manufacturing process where the machine used is controlled by a computer. The most common forms of digital fabrication are CNC Machining, Laser Cutting, and 3D Printing. (Source: Open Desk), Google Search, Digital Fabrication Pintrest Board by Nazım Dağdeviren
CAD -> CAM
- CAD = Computer-Aided Design
- Input: Idea for 3D model; Output: 3D model and instructions for CAM.
- CAM = Computer-Aided Manufacturing
- Input: Toolpath file / instructions; Output: Physical Object
Typical Digital Design to Physical Production Workflow
Step 1: Design with one or more CAD tools for the desired production method(s).
Step 2: Fabricate by hand (ie. cut, carve, bend, sand, etc), with manually controlled machines (ie. Mill, Lathe, Saw, Drill, etc), with Computer Numerically Controlled Machines (ie. CNC Mill, CNC Router, 3D Printer, Laser Cutter, Plasma Cutter, Water Jet Cutter, etc) or some combination of all methods.
In general, most workflows consist of a series of steps where specific tools and knowledge are put into action to complete the step and move to the next step in the process.
In terms of digital to physical workflows, we're always dealing with data in some form / file format. Its good practice to get familiar with input and output formats for any CAD tool you work with because you then know what the tool is capable of and how other tools can interface with it. Most CAD environments can work with a variety of 3D file formats such as .STL, .OBJ, .STEP, and many others.
3D Meshes
A polygon mesh is a collection of vertices, edges and faces that defines the shape of a polyhedral object in 3D computer graphics and solid modeling. The faces usually consist of triangles (triangle mesh), quadrilaterals (quads), or other simple convex polygons (n-gons), since this simplifies rendering, but may also be more generally composed of concave polygons, or even polygons with holes.
Source: Wikipedia
Besides designing a 3D model directly in CAD, what other ways can you get a 3D model or 3D mesh?
- Downloading a model from Thingiverse
- 3D Scanning - Structure Sensor 3D Scanner
- Photogrammetry - Autodesk Remake
- Data Driven - Microscape, Tutorial on making 3D printed maps
- Algorithmic / Generative - Form+Code in Design, Art, and Architecture
- fMRI, CT (Medical Imaging) - 3D print of my brain and skull from MRI data
- Confocal, etc (Biological Imaging) - Imaris
Designing for 3D Printing
- How do you design a 3d model in general and/or to 3D print? CAD
- How do you prepare a design and print it? Use a Slicer tool to produce GCODE needed by printer. See below.
- What kinds of materials are used? PLA or ABS are the most common.
- What kind of printing process should I use?
- It depends on the thing you want to make, how much you want to spend on it, and the material you want/need to use. Fused Deposition Modeling (FDM) is the most common and cheapest.
- Additive Manufacturing Technologies (Image), Source: 3D Hubs
Slicing for 3D Printing
Slicing tools convert a 3D mesh (STL) into GCODE to run the printer. This is not to be confused with the Autodesk tool - Slicer for Fusion 360. That is a tool for converting 3D models into 2D pieces that can be cut on a laser cutter with 2D sheet material to assemble into a 3D model after.
- Cura is what we use for the Ultimaker 3.
- Slicing Process
- Load STL file into Cura
- Choose PLA material for Extruder 1 and PVA for Extruder 2 (If using support material)
- Choose a print profile (aka Layer Height: Start with Fast or Normal options)
- Choose an infill (Density)
- Save GCODE file and copy to USB drive
Designing for Laser Cutting
- How do you design a 3d model to laser cut? CAD. Use a CAD tool to design in 3D and convert a 3D shape into 2D pieces. Sometimes this step requies specialized software. See below.
- How do you prepare a design and laser cut it? Use a vector graphics tool like AI to layout file and assign color mapping. This is how the system will know what machine settings to use for the paths in your file.
- What kinds of materials are used? Sheet material - Paper, wood, cardboard, plastics.
- What methods can you use to make a 3D object out of flat 2D sheet material? Look at examples in Slicer for Fusion 360. More advanced versions of these techniques are referenced in the resources below and mostly use Rhino + Grasshopper to implement.
- Stacked layers (or stacked slices)
- Waffle (or interlocked slices)
- Triangulation / Unrolling (or folded panels)
Fusion 360 Workshop
Download & Install
- Fusion 360 Students Download - Free for students. Make an Autodesk account and install.
- Fusion will be automatically placed in the macOS dock as a shortcut after install.
- To prepare 3D models for laser cutting you can use Slicer for Fusion 360 to create files for some of the methods above.
The Basics
- The Interface
- Workspaces, Tools, Navigation, Movement, Projects
- Model Hierarchy (Browser)
- Timeline (Model History)
- Making Sketches
- Defining Constraints
- A Guide to Fusion 360 Sketch Constraints - A great set of videos for each constraint type.
- A List of Constraint Types
- Dimensioning a Sketch
- Fully Defining a Sketch
- Pro Tip: Anything "Blue" is not dimensioned which means it can be moved around. Anything "Black" is dimensioned which mean is has a size. Once the whole sketch is Black it is "Fully Dimensioned." This means it's "locked" into place.
- Defining Constraints
- From 2D Sketch to 3D Model
- Extruding Sketches (Create > Extrude)
- Sketches vs Bodies vs Components vs Assemblies
- Exporting 3D Models for 3D Printing
- Whats a mesh? (Think Minecraft or Low poly art.)
- 3D meshes are defined using the STL file format.
- Mesh Refinement (Higher Quality = More Triangles). Example: Stanford Bunny
- Example: Viewing Meshes in Meshlab or MeshMixer
- Exporting 2D Paths for Laser Cutting
- Select a sketch or surface to make a sketch on and make a new sketch.
- Name the sketch accordingly with a label "Export DXF".
- Export: Right click on the sketch and export a DXF file.
- Alternative method: Use the DXF exporting script here for exporting many named sketches.
- Layout the DXF file in Adobe Illustrator or another vector graphics or CAD program in preparation for laser cutting.
- Assign colors to paths for vector cutting (red stroke), vector scoring (blue stroke), and raster engraving (black fill). The color mapping will depend on the system used.
A Step Further
- Making Mechanical Drawings (2D) (aka Making 2D blueprints)
- File > New Drawing From Design
- How to Create a Drawing From Your Design (Video)
- Note: This is the kind of drawing you need to develop in order to interface with the machine shop at Idea Forge. When they say they need a "fully dimensioned drawing", this is what they are talking about.
- Defining a Parametric Model
- User Parameters ("Sigma" Icon)
- Change Parameters Dialog Box
- Equations and Parameters in Dimensions
Resources
Learning Fusion 360
- Fusion 360 Gallery
- Fusion 360 Manual
- Learn Fusion 360 in 60 Mins
- Fusion 360 Design Academy
- Fusion 360 Adoption Portal
- Fusion 360 Forum - Need help? Check here.
- Tutorials
- Arduino UNO Enclosure Tutorial (Arduino UNO Model, Arduino Drawing), Shorter version
- Parameter Driven Project Enclosure
- Bookshelf Tutorial - Watch to get a good walkthrough of sketching basics.
- Making Parametric Models in Fusion 360
- Easy Snap Fit Cases
- Udemy: Product Design in Autodesk Fusion 360 from idea to prototype
- Udemy: Designing for 3D Printing with Fusion 360
Design for 3D Printing
Note: These resources have been placed into the Design for 3D Printing guide in the left sidebar under Guides.
- Additive Manufacturing Technologies (Image) Source: 3D Hubs
- Additive Manufacturing Technologies: An Overview
- Paper: Thingi10K: A Dataset of 10,000 3D-Printing Models, Website
- Design Guides - Think of these are useful resources regardless of the printing process.
- What is the best type of plastic for my 3D printing application?
- How to Design Snap Fit Components
- How to Choose the Best Fasteners for 3D Printed Parts
- Shapeways: Modeling & Design Tips 3D Printing Tutorials
- Simplify3D: Print Quality Troubleshooting Guide
- Repairing 3D Files With Meshmixer and Netfabb
- Adding Screw Threads
- i.materialise Design Guide
- 5 Mistakes to Avoid When Designing a 3D Model for 3D Printing
- Key design considerations for 3D Printing
- Enclosure design for 3D Printing: A step-by-step guide
- Formlabs Tutorials - Great design references for SLA printing. Idea Forge has these machines.
- Post Processing
Assignment 8: Bits to Atoms
Design and fabricate a 3D object using a CAD and CAM method (3D Printing or Laser Cutting) of your choice. I highly recommend you use the 3D printers and laser cutter at the Idea Forge to complete this assignment. Note this assignment will take time to design, fabricate, and assemble so get started asap. Also, note the Idea Forge does NOT have weekend hours for printing and using the laser.
For 3D Printing:
- You may utilize the printer in our studio if you have walked through it with me or another student.
- There is currently a limited amount of material and only 1 machine in our studio so I advise you to purchase a roll of PLA filament if you would like to print something larger than 2-3 in or in a specific color. Gizmodorks or Amazon are great places to find a roll of 3.0 mm PLA filament. They are around $20-$30 for a 2.2kg roll. You could even share the cost with others.
- Pay attention to the size of your model and print times.
For Laser Cutting:
- You can use the system at the Idea Forge once you have files prepared. In general, you will need to have a vector graphics file in .AI, .DXF, or .EPS to interface with their system. I assume most people use Adobe Illustrator and can create a file for this purpose.
- The Idea Forge has an Epilog Fusion 40 machine with a bed size of 40 x 28 in. Setup an Artboard in Illustrator to this size as we did in class.
- For materials, start with 3 mm or approx 1/8" thick cardboard and design to these specifications.
Always check with the Idea Forge staff on correct protocols for printing and laser cutting.
Thoughts on getting started:
- Sketch out on paper something original that addresses a need.
- Do you need a case for your Arduino or Raspberry Pi based project? Determine the specifications for your case and draw it in CAD. Hint: Look for tutorials on this. There are alot.
- Explore one or more digital fabrication methods (contouring, triangulation, waffle, unrolling geometry, or some combination of these) and produce a physical instance of it. For example, you might have a 3d model that you would like to produce at large scale. Larger than might be possible in a single 3d print within a reasonable amount of time. What method would you use to produce your model? What if the model were triangulated? Or contoured? What material would you choose? What steps need to be taken in the digital domain to translate into components that can be produced and assembled physically?
- Analyze and recreate an existing product or object you find interesting
- Maybe you have a final project idea that requires physical parts? Can they be printed or laser cut?
- Do you have any product ideas? What method of manufacture might work to make them tangible?
- Explore some of the resources listed for 3D printing. Look through the design guides below and seek out additional resources to aid your design process. As with most ideas turned into CAD models, I suggest start by hand sketching your ideas out. Think about the problem you wish to solve or the questions you have around whats possible with this tool / medium / material.
- Think about the forms you want to model, the parts you want to use in an assembly, the mechanical movements you wish to explore, etc. Don't let the tools or process get in the way of you producing an instance of your idea. Start simple and make many iterations until you get to something that communicates your intent.
Deliverables:
-
A 2-3 min video showing what you made.
- Include recorded video, screen capture, images, audio, or graphics of your explorations working. Include screen shots or photos of specific moments of interest you encounter and wish to communicate in the project development.
- Consider adding more details to your videos by talking over the clips, adding music or sound, and using labels or callouts to increase production quality.
- Talk about the types of tools and software used. Talk about your workflow from design to physical object.
- Embed the video into your blog post.
-
Physical model(s). Bring all models produced to class. Take photos of completed models and put them in your documentation.
-
Export a mesh (STL File) of your model and upload it to Sketchfab (You will need to make an account). Once uploaded to Sketchfab, embed your uploaded model into your blog post. Here's a tutorial about how to do this. This is basically the same as embedding a Youtube video into a blog post, but with a 3D viewer window containing your model, which you can manipulate and even visualize in VR! Cool eh!?
-
A brief writeup on your blog about your learning experience. What hurdles did you encounter and how did you overcome them? What worked and what didn't? What new tools did you try? How would you explain what you've done to someone that doesn't know anything about 3d modeling or digital fabrication?
Submit a link to your post on Slack #cmstudio before our next class.
Due: Oct 28
Week 10: No Class
Oct 28
- Class canceled due to weather conditions - https://alerts.colorado.edu/
Week 11: Parametric Design
Nov 4
- Assignment 8 Share
- This week we will be looking at Rhino & Grasshopper for parametric design. While it is possible to utilize Fusion 360 in similar ways through User Parameters and python scripting (via Fusion 360 API), it really is a different design paradigm and I encourage you to explore it. This toolset will be our primary environment for Spring 2020 course APRD-5017: Parametric Product Design.
- As time allows, we will look at making quick renders using Keyshot.
Rhino & Grasshopper Overview
- What is Rhino?
- Rhino is a CAD tool for designers and architects. It's considered one of the standard 3d modeling tools for product designers across many different industries.
- Rhino Download for macOS - Free for 90 days. Edu License available for ~$90 @ CU Bookstore. Rhinoceros will be in your Applications folder after install.
- What is Grasshopper?
- Grasshopper is an node-based algorithmic modeling environment plugin for Rhino. As of Rhino 6.0 it's included when you install. You access it by typing
Grasshopperinto the command interface in Rhino. When you launch the tool it will open a separate window that overlays the Rhino window. Just position Rhino on half of your screen and Grasshopper on the other half. - Old Grasshopper Website / Forum
- Current Grasshopper Forum
- Google Search: Rhino Grasshopper
- Grasshopper is an node-based algorithmic modeling environment plugin for Rhino. As of Rhino 6.0 it's included when you install. You access it by typing
- Rhino for Windows vs Rhino for macOS
- Rhino for Windows is much older than Rhino for macOS and therefore contains a bit more functionality (for now).
- There are many open-source and proprietary plugins available for both Rhino and Grasshopper but not all are compatible for both operating systems yet. To get something to work the way you want, you sometimes need to use both OSes.
- Rhino 6 for Windows commands not in Rhino 6 for Mac
- Whats possible with Rhino + Grasshopper? Why use them?
- There are many design oriented or industry specific reasons but one BIG reason to use the tool is for its extendability through plugins (food4Rhino) for both Rhino and Grasshopper.
- Plugins such as Grasshopper enable all sorts of design possibilities in computational design, parametric design, and generative design.
Parametric Design is a process based on algorithmic thinking that enables the expression of parameters and rules that, together, define, encode and clarify the relationship between design intent and design response. (Source: Wikipedia), Google Search
What types of objects can be considered "parametric"?
Anything really! Just a few examples: Cups, Vases, Pitchers, Bottles, Bells, Bowls, Clothing, Furniture, Lighting, Buildings!... and more!
- Parametric Design Examples
- Co-de-iT
- Zha Code Edu
- Designmorphine
- Opendesk
- Formlabs Digital Factory Pens
- New Balance 3D Printed Shoe
- Nervous System Kinematics Dress
- Gillette Uses 3D Printing to Unlock Consumer Personalization
- Siemen Cuypers - Designer
- Diana Kasko - Process 1, Process 2, Process 3
- nendo chocolates
- modular chocolates
- Firefly Experiments - Tool for connecting Arduino to Grasshopper.
- LaN: 3D Tiles
- LaN: Folded
- LaN: CNC Mill Interiors
- LaN: Triangulation
- LaN: 3D Space Shape
- CW&T 100 Dropped Pendant Lights
Intro to Rhino (Workshop)
Objective: Become familiar with the Rhino interface and workflow in order to create 3d models.
Interface Basics
- Understanding the User Interface
- Viewports (Top, Left, Right, Perspective)
- Coordinates (X, Y, Z). X = Red, Y = Green, Z = Blue
- Windows (Multiple Windows Open == Multiple Files Open)
- Render Modes (Wireframe, Ghosted, etc)
- Toolbars (macOS)
- Left Sidebar - Command Line, Osnaps
- Right Sidebar - Layers
- Buttons = Commands. Almost all buttons are tied to a command you can type in.
- Menus / Sub-Menus (Little triangle on a button)
- The Command Line (Top Left) - Just type something...anything. See what happens! ESC to exit command.
- Repeat last command with Right Mouse Button > Repeat Command.
- Movement (Zoom (Two-finger pinch),
ZS, Pan (Right mouse click), Orbit, Gumball)- macOS Tip: Turn off two-finger mouse zooming (but allow pinch zooming) by unchecking "Enable magic mouse gestures" under Rhino > Preferences > Mouse > Magic Mouse.
- Hiding / Showing objects (Light Bulb on Layers; Hide / Show Commands)
- Units - Changing Units, Grid (File > Settings > Units)
- The Grid (File > Settings > Grid to change), Osnaps (Snapping options on bottom half of left sidebar)
- Working with Layers (Right Sidebar)
- Layer Name
- Colors (RGB)
- Hide/ Show(Light Bulb)
- Active Layer (Radio Button) - This determines where you are creating new geometry.
- Other Panels - Object Properties, Display Properties, etc
Geometry Basics
- Drawing Geometry
- 2D Geometry - Curves, Surfaces, Polycurves, Text
- 3D Geometry - Surfaces, Polysurfaces, Solids
- Isocurves - "Hidden" curves located on / making up surfaces.
- Object Details (Selection) - See information about a selected object in the lower right sidebar.
- NURBS (Non-uniform rational B-spline) vs Mesh
- Turn On/Off points on curve with
PointsOnandPointsOffor F10 key.
- Transform Commands
CopyMoveScaleRotate
- Manipulate Geometry
Explode,Join- Join vs Group
Trim- Selection -
SelCrv,SelSrf,SelPts LoftPipe
File Input / Output
- File types: 3DM, STL, OBJ, EPS, DXF
- How should you export a file for fabrication?
- STL or OBJ - 3D Printing, CNC Milling
- DXF, AI, EPS - Laser Cutting
Additional Commands
There are many commands available in Rhino. Above and below are just a few of the most used commands. Check out the Rhino 6 Command List and Rhino 6 for Windows commands not in Rhino 6 for Mac to learn more.
PictureFrameContourMeshtoNURBDistanceDimBooleancommandsHide/ShowOffsetDupBorderExtractWireframeTextTextObjectSelDupExtrudeSrfMake2D
Generator or "Factory" Examples
Produce variations of a 3d model from a "generator" or "factory". This means to work iteratively to explore a form making process where the designer changes features of the system to produce a family of different results. This process takes advantage of the History command to associate recorded parameters to each other, which is a characteristic of Parametric Modeling as done naturally in Fusion 360 and further enabled through Grasshopper.
The following examples are in the cm-design/rhino folder.
Example 1: Parametric Loft Generator
- Draw two circles and a hexagon on the Top viewport
- Goto Perspective and move one circle up and the hexagon into the space between the circles.
- Turn on History (Top tool bar)
- Loft between the 3 curves starting from the bottom
- Turn off History
- Manipulate the curves to produce different results. When you change a curve you should see the resulting Lofted form change.
- Make a copy of the lofted form to the right.
- Repeat until you have several forms
Example 2: Parametric Revolve Generator
- Draw an interpolated or straight profile curve in the ZX plane in the Front viewport.
- Goto Perspective and select the curve.
- Turn on History (Top tool bar)
- Revolve a full 360 deg around the center axis (Z Up direction) with the curve. This will produce a 3d form.
- Turn off History
- Manipulate the control points from the single profile curve to produce different results. To do this, turn on control points with PointsOn (F10) and click to drag. The Gumball feature helps to move objects in a scene. When you change the curve you should see the resulting Revolved form change.
- Make a copy of the revolved form to the right.
- Repeat until you have several forms
Example 3: Parametric Pipe Generator
- Draw a curve in the Front viewport.
- Goto Perspective and manipulate the curve using control points (PointsOn).
- Turn on History (Top tool bar)
- Pipe along the curve, setting different radii along the length of the curve.
- Turn off History
- Manipulate the curves to produce different results. When you change a curve you should see the resulting Pipe form change.
- Make a copy of the form to the right.
- Repeat until you have several forms
Example 4: Parametric Surface Generator
- Draw a curve on the XY plane seen from the Top viewport
- Goto Perspective viewport and select curve, use PlanarSrf to create a surface.
- Select the surface and enter Rebuild. Use a U and V division of 10 for each. This will create a dense grid of points on the surface, increasing the number of isocurves.
- History is enabled by default with this type of surface. Manipulate the control points (PointsOn) to make new forms.
- Make a copy of the form to the right.
- Repeat until you have several forms
Student Examples from Last Year
- Pumpkin Patch by Karen McClellan
- One WTC 3D Print by Jonas Escobedo
- Perfume Bottle by Hanshu Zhou
- Lipstick by Sarah Cohen
- Chocolates by Diamond Alexander
TAKE A BREAK!
Intro to Grasshopper (Workshop)
Type Grasshopper into the Rhino command prompt to launch Grasshopper.
Interface Basics
- Setting Units (in Rhino)
- Arranging windows / Hide show Grasshopper
- Dual monitor is ideal setup to see both Rhino and Grasshopper
- The Canvas (where you drop components)
- Double click to type in name of a component you want to add
- Space bar to access quick commands like preview, bake, and preferences
- Recent commands bar (on bottom left)
Tool Bars & Component Groups (Tabs)
- Primitives
- Math
- Set
- Vec
- Curve
- Surface
- Mesh
- Intersect
- Transform
- Display
Working with components
- Drag and drop components into the canvas
- Selecting components
- Tooltips
- Connecting / Disconnecting components
- Aligning components
- Messages (Orange and red bubbles on component)
- Grouping components
Working with geometry
- Assigning Rhino geometry to Grasshopper components
- Creating Grasshopper based geometry and visualizing it in Rhino
- Baking geometry (Geometry in Grasshopper -> Rhino)
- Points, Lines, Planes, Volumes
Grasshopper Examples
The following examples are in the cm-design/grasshopper folder.
Example 1: Basic Image Sampler
Example 2: Basic Attractor
Example 3: Vase Builder
This example shows a way to implement a Vase or Vessel type design using Grasshopper. The screenshot shown in the repo is rendered using Keyshot.
Rendering with Keyshot
Keyshot is an entry level rendering tool. It features drag and drop material, color, lighting, environments, and more. Download the 14 day trial to start experimenting. Go through the Keyshot Tutorials to get a basic understanding of the tool and how to use it.
Basic Process:
- Export a 3D model file from CAD (Rhino 3dm, STL, etc)
- Import into Keyshot
- Compose the scene
- Assign materials, lighting, environment, etc
- Save a screenshot. Depending on how powerful your computer is, you will have to wait longer for better screenshot renders.
Tips:
- The demo doesn't let you save the project file. Save lots of screenshots!
- Use the "screenshot" feature to save decent looking images from the viewport. It saves them into
Library/Application Support/Keyshot8/Renderings/ - To increase resolution of a screenshot make your window full screen and use the "Reitna Mode" feature. Your computer may slow down a bit more doing this but it will give you a higher resolution image in the end.
- Don't bother with the Render mode since it puts Keyshot watermarks all over the image. The screenshot tool only places a small mark in the bottom left corner (easily removable via Photoshop).
Resources
Rhino
- Rhino Tutorials
- food4Rhino - A large repository of plugins available for Rhino and Grasshopper.
- Think Parametric: Rhino 101 - Fundamentals of 3D Modeling
- Plethora Project
- Lynda.com Rhino 5 Essential Training
- Create a Pattern on Vase Surface - Neat beginner tutorial showing how to apply a pattern to a surface.
- Modeling an Espresso Cup and 3D Print with Shapeways
- Step by Step Tutorial of Modeling a Mug - A great beginner tutorial walking through modeling a mug from references images.
Grasshopper
- Grasshopper Primer - A great entry point to Grasshopper.
- Visual Programming in Rhino3D with Grasshopper / Amazon
- Think Parametric: Grasshopper 101 - Introduction to Parametric Modeling
- Bifocals - A Grasshopper plugin that labels every component in a definition. This is really useful when trying to understand a definition created by someone else.
- AAD Algorithms-Aided Design: Parametric Strategies using Grasshopper - Introductory book to the field of Parametric Design and Algorithmic Modeling with Grasshopper.
Digital Fabrication Methods
Some of these examples use Rhino / Grasshopper and should look familiar if you experimented with Slicer for Fusion 360 last week.
- 3D Models of Polyhedra
- Sometimes an idea can begin with a simple 3D shape. The first step is acquiring said 3D shape to work with. Here are a few ways to produce a polyhedra.
- Platonic Solids
- Rhinopolyhedra - Rhino Plugin
- Paper Models of Polyhedra - In the event you just want a polyhedra of some kind, here is a place you can download a printable version to cut and fold up.
- Unrolling
- Contouring
- Triangulation (Faceted)
- Waffle
- YoutTube: grasshopper tutorial # waffle structure ribs part 1
- YoutTube: grasshopper tutorial # waffle structure (ribs) laser cut file part 2
- Sectioning design systems by HASSAN RAGAB
- YouTube: Waffle structure - Grasshopper Tutorial
- YouTube: Grasshopper 006 waffle structure beams concept & fabrication - Put this on MUTE!
Rendering
Books / Other
- Siteless: 1001 Building Forms
- Pasta by Design
- Generative Gestaltung
- Form & Code
- Written Images Book
- Mathematica / Student License Info
Assignment 9: Form Finding
Enter the world of parametric design through form finding using Rhino and/or Grasshopper. If you feel a bit more comfortable using another CAD tool you may do so as long as you are able to adapt the concepts of parametric modeling to the tool you are using.
Explore form finding through the "factory" or "generator" approach discussed in class (examples above in the course resources). Work iteratively to generate at least 10 variations or instances (outputs) of your parametric design and render them as digital and/or physical objects using any approach you wish. Meaning, you may save STL files out and place them into a Sketchfab viewer, or render using a dedicated render solution such as Keyshot, the Rhino rendering tools, Fusion 360's render workspace, or save screen shots from Rhino (Use the ScreenCaptureToFile command to save screen shots from the viewport). You might also consider 3D printing or laser cutting one or more instances of your design to bring it out of the digital and into physical.
Perhaps your final project concept will require digital (rendered) or physical (fabricated) 3D models -- use form finding as a tool to identity interesting forms and shapes that meet your project requirements or design constraints and proceed to create one or more models.
Thoughts on getting started:
- Work through the Rhino notes above from class. Focus on getting comfortable using Rhino to make points, lines, curves, and surfaces using the 2d tools and 3d tools available.
- Get more familiar with Rhino by working through the Intro to Rhino tutorial in the cm-desgn/rhino folder.
- Try out all the Rhino commands listed above in the notes. There are many more of course but start with a few and learn how they work.
- It's best to approach a complex tool like Rhino with a specific goal in mind. Do some research on the idea and you can likely find a tutorial or resource out there that can assist with your idea.
- Look at related project concepts and attempt to deconstruct them. Use other project ideas as inspiration.
- Similar to past projects, start and work simply to understand just a few features of the tools available. Don't try to go too far too fast. One can explore this concept of form finding through the manipulation of simple 2d and 3d geometries in combination with the History command.
- In the process of form finding, think about a set of design constraints your 3d model will achieve. For example, say I design a mug with a parametric hangle on it and the body of the mug is fixed in its width, height, and thickness. What properties of the handle might I consider as parameters (ie. things that can change about the handle geometry)?
Deliverables:
-
A 2-3 min video showing your form finding explorations.
- Include recorded video, screen capture, images, audio, or graphics of your generator and its outputs.
- Attempt to use rendering tools to produce higher fidelity representations of your models. Digital renders can provide context for a design (or idea) through the use of environments, textures and materials, and lighting.
- Consider adding more details to your videos by adding title screens, talking over the clips, adding music or sound, and using labels or callouts to increase production quality.
- Talk about the types of tools and software used. Talk about your workflow from initial research and sketches to digital experimentations to physical object(s).
- Embed the video into your blog post.
-
Export mesh (STL Files) of your model and upload them to Sketchfab. Embed the viewer into your bog post. In this case perhaps you combine all the models created into a single viewer or multiple viewers for many instances.
-
(Optional) Physical model(s). Bring all models produced to class. Take photos of completed models and put them in your documentation.
-
A brief writeup on your blog about your learning experience. What hurdles did you encounter and how did you overcome them? What worked and what didn't? What new tools did you try? How would you explain what you've done to someone that doesn't know anything about parametric design?
Submit a link to your post on Slack #cmstudio before our next class.
Due: Nov 11
Week 12: Open Studio / Intro to VR Tools
Nov 11
- Assignment 9 share
- Open studio to discuss previous assignments or final project ideas
- Setup VR tools and demonstrate Unity workflow
Assignment 10: Final Project Proposal (Update)
- Prepare and submit a Final Project Proposal by class time next week.
- You are welcome to work solo or in pairs on a project.
- Each person needs to submit their own documentation of the project.
- Formats: Project examples include web based applications, connected experiences, smart devices, everyday/enchanted/functional objects, media based installations, and product based experiences.
Thoughts on getting started:
- Review your Assignment 1 and Assignment 2 and other weekly blog posts for ideas and thoughts you have had over the course. What's your question?
- Make a list of questions you have about a particular subject we touched on in class and pick one to build a project around.
- Revisit and expand on a previous assignment with greater depth in execution and higher fidelity in representation.
- Review the resources for previous weeks and choose a project, set of technology, workflow, or process to investigate and document in the form of tutorial, educational experience, website, or app.
- Look at related project concepts and attempt to deconstruct them. Use other project ideas as inspiration and benchmarks for your the quality of work you wish to accomplish. Again, what's your question?
Some Previous Projects
- I AM WHAT I WISH (Art Installation) - by Jonas Escobedo, Allison Spiegel, Makenna Considine
- Hive Brand Ice Cream (Ice Cream / Packaging Design) - by Makenna Considine
- Marshmallow Crossbow - by Hanshu Zhou
- Breathe - A Kinetic Wall Installation - by Nikki Cavalier
- Seasons - A VR Experience - by Nikki Cavalier
- Typography Cookie Cutters - by Sarah Safranski
- Stress Map by Matt Isola
- Other Examples: VR Maze Experience, Escape Room, Automated Dog Feeder Prototype, Ovulation Tracking Smart Device, Web Based Synth/Sequencer, 3D Printed Natural Monunemnts Installation, Scale Model of Airport Security Experience, Planetary Chocolate Molds, Bob Ross Chrome Webapp, VR Home Walkthrough, RFID Smart Ring, 3D Printed Furniture
Due: Nov 18
Week 13: Final Projects
Nov 18
- Share project proposals
- Open studio time to work on projects
Week 14: Fall Break
Nov 25
- Fall / Thanksgiving Break - Nov 25 - 29, No class.
Week 15: Final Projects
Dec 2
- FCQ's
- Open studio time to work on projects
Week 16: Final Project Presentations
Dec 9
- Dec 12th - Last day of Fall classes.
- Final project presentations on Wednseday December, 11th from 6-8pm.
Final Project Documentation
- Making The Scheherazade Nightgown by Gia Almuaili
- Yvonne Danyluck
- Vanessa Frye
- VR Gallery by Min Kim
- Wrapping Up by Megan Kwiatkowski
- The Illusion of Life 1.0 by Nick Lunt
- Rethinking the Kitchen by Aitana Rothfeld
- Metamorphosis of Chocolate by Josh Sheetz
- Mapping World Literature with Mapbox by Tess Stevens
- Bear the Necessities by Caro Beresford-Wood
- Google Trips by Yeon Choi
- Facing Your Fears Virtually by Steven Douglas
- Sonic Shell by Mark Grundberg
- 5000 Snowflakes by Clayton Kenney
- ANALOG TECH by Dave Laskowski
- Reducing Visual Complexity by Derek Palmer
- Spatial UX in Rhino by Nicole Tang
- Desk Lamp by Yangmin Zhang