Critical Making Studio
CMCI STUDIO at CU Boulder
Nothing is a mistake. There's no win and no fail, there's only make. ~ John Cage
Critical Making Studio is the foundational experience enabling students to realize their full potential as creative citizens in CMCI STUDIO. Central to the studio are four courses, Critical Making 1 and 2 (Fall), and Critical Making 3 and 4 (Spring), in which students enter into an experience as transformative and diverse as the participants themselves; all unique threads woven into whole cloth, informing the very fabric of studio culture. The courses aim to ground students in making as a deeply personal practice and ongoing journey in life thereafter, resulting in creative citizens capable of realizing that which they can envision utilizing a combination of their talents, intellect, abilities, creative faculties, and support networks.
The studio experience is made possible by 24 hr, 7 days a week, access to a state-of-the-art rapid prototyping shop, media editing suite, and studio workspaces that can be transformed into a variety of configurations supporting activities such as artistic performances and special events. Additionally, access to fellow students, faculty, and industry partners provides an unparalleled educational experience and support network for developing transformative solutions spanning a variety of creative industries.
Critical Making 1 & 2
Critical Making Studio 1 & 2 are first semester project-based studio courses that provide a foundation in the creative process of making with new and emerging digital and physical technologies responsible for shaping and reshaping the world around us. In these courses students work towards becoming fluent across digital and physical creative practices used in the development of new products and services. This includes developing project documentation, building skills in modern web development tools and workflows, 2D/3D modeling using Computer-Aided Design (CAD) tools such as Rhino and Autodesk Fusion 360, and leveraging digital fabrication tools and materials such as 3D printing and CNC machining to produce physical prototypes.
Date and Time:
Critical Making Studio 1 (BD Group) - Tuesdays, 9 am - 12 pm
Critical Making Studio 2 (UX Group) - Wednesdays, 9 am - 12 pm
Instructor:
RJ Duran
rj.duran@colorado.edu
Slack: @rjduran. #cmstudio on cmcistudio.slack.com
Office hours by appointment. Feel free to reach out to me via slack or email.
Syllabus:
CM 1 Syllabus
CM 2 Syllabus
See what we're up to! Follow us @criticalmakingstudio and @cmci.studio.
Course Resources
This website is the primary resource for all critical making studio courses. Most of the resources used in the courses are divided up into sections that can be found on the left sidebar. Think of these resources as maps containing many possible tools that could help you accomplish your work and from which you will need to choose some to learn and work with. There are pros and cons to any tool but all have a set of functionalities and a purpose. As with any tool and any kind of personal creative process you are free to choose anything that works for you as long as the work gets done. As we move through the phases of the course feel free to recommend, add, and update the tools we and you find useful. Also, note that anything specific and relevant to an assignment or project will be listed out under the assignment or project deliverables.
Workload
- The critical making courses are 3 credit hours each. You should expect to dedicate at least 2-3 hours per credit hour. This translates into a 6-9 hours per week. Consider 6 hours a minimum expectation for one studio course and plan accordingly with your other studio courses.
- Assignments given each week are "due" the following week by the start of class time. Important: Assignments are not graded but projects are. Completing all assignments is HIGHLY recommended. It may be difficult to complete projects on time if you don't complete assignments on time.
- Projects are assigned in the 3rd week of each phase and due by 11:59pm on the date specified in the project deliverables. Projects can be thought of as a more developed assignment as they will build on the skills acquired in the phase.
Phase 1: Going Digital

Week 1: Intro to Critical Making, Project Management, Documentation
Aug 28 / Aug 29
- Introductions (Slides)
- Course Website / Schedule / Workload / Resources
- Project Management Tools
- BLDG61 Boulder Library Makerspace
- Emerging Technology
- Examples of Creative Work / Documentation of Process
- Creative Applications
- IDEO
- Sarah Jones - Artist / Illustrator
- Jonathan Harris - Today
- Mike Winklemann aka Beeple
- Ash Thorp
- Bradley Munkowitz aka Gmunk
- UVA
- The Made Shop - Adobe Remix (2013) - Denver Based Shop
- Legwork Studio - Denver Based Agency
- Meow Wolf
- Otherlab
- Tycho
- Olafur Eliasson
- The Mill
- Breakfast NY
- Pioneer Works
- Subrosa
- Mullenlowe
- Autodesk Pier 9 Residency Projects
- Creativity, Vulnerability, Practice, Making
- Other (Creative) Resources / Projects
- Designspiration
- Behance
- Grey Scale Gorilla - Cinema4D Motion Graphics Tutorials
Assignment 0: Setup a "Maker Blog"
A place to document your work for Critical Making. This can be a part of your current portfolio website or a separate website or blog. Regardless of where it exists, you need to have a place for sharing your work using images, video, and text. Everyone in STCM has a Medium blog they are working out of for RE Studio. You are free to use this as your CM blog if you wish. You may want to make use of post categories for your different types of posts in this case. For example, tag a post with "Critical Making".
- Examples from last year:
- Examples of similar sites:
Assignment 1: Final Project Concept
Create a "model" (sketch, raster, vector, 2D, 3D, render, animate, simulate, etc.) of a possible final project. The word "model" is meant to be understood as any kind of digital or physical representation of an idea or concept you are excited about pursuing in your course of study in critical making. Possible examples: websites, web applications, objects, artifacts, products, digital-physical experiences, installations, performances, platforms, artworks, tools, machines, devices, etc. Begin to think about the various concepts, tools, and technologies associated with your brand design or UX studio courses and how they may inform the development of such a project.
Deliverable:
Post your concept on your blog and share a link to it via Slack #cmstudio before the next class. Include images, video, text, sketches, etc that support your (big) idea. We will discuss your concepts in class next week. Optional: You might consider recording a short video describing your project using a screen capture tool such as Screencast-o-matic or from your phone if it makes sense. If you do this, create a Youtube account, upload your video, then embed the video in your blog post.
CM1 [Tues]: Due Sept 4
CM2 [Wed]: Due Sept 5
Week 2: MacOS/Terminal, Web Development I
Sept 4 / Sept 5
The next few weeks will be about current web development paradigms and practices -- getting comfortable with programming for the web, learning how to use web development tools and workflows to solve problems, and building a personal practice around using these technologies for projects.
If you are curious about the history of electronics, computers, computer science, programming, and the Internet, check out the Histories section. I strongly advise you to start getting familiar with the various histories and technological underpinnings of the technologies you use every day. Remember, it's also about building awareness and understanding about the systems that run our world. These resources are meant to work through at your own speed and as you begin to ask deeper questions about why something works and how something works.
In the weeks ahead you will begin to build your web development skills inside and outside of class. We will approach each language and weekly topic with simplicity in mind and focus on understanding fundamental concepts. To build advanced skills with the tools we discuss you will need to dedicate time outside of class for further study and for building projects. We will approach topics in a hands-on workshop format so be prepared to dive in.
The Web
-
What is the Web?
- What is its purpose?
The big idea: The purpose of building websites and web applications is to make an idea accessible to one or more people through the Internet.
-
How does it work? -- Recall what you saw in RE Studio Week 1 starting on Slide 25.
- What is it made of? -- Hardware, Software, Servers, Domains, Protocols, Stacks, Languages, Frameworks, Browsers, APIs, Tools, Modules, Databases, Ports, Data, Information, CMSes (Wordpress, Squarespace, Wix, etc), etc.
The Industry
- What is web development in 2018?
- What does a web developer do?
- How do you build web development skills? (HINT: Practice, practice, practice)
Stacks
- Front-End = HTML, CSS, Javascript, Design, Interactivity, Responsive
- Back-End = Ruby, Python, PHP, Node, MySQL, PostgreSQL, MongoDB, Dev Ops
- Full-Stack = Front-End + Back-End + DevOps + Design
Good Reads
Read through each one. Click on the links. Read about the tech. Take a breath. Begin to understand how things connect - make a map if you need to. Don't get overwhelmed. Make a list of the technologies you read about. Try some of them out in your sandbox.
- Front End, Back End, Full Stack—What Does it All Mean?
- Front-End vs Back-End vs Full-Stack on Udacity
- A Guide to Becoming a Full-Stack Developer in 2017 - If you only read one of these, read this one.
- How it feels to learn JavaScript in 2016 - Read through this and see if you can begin to make sense of the current development ecosystem. (Note: Its complex and a little bit insane but this guy makes a good (fun) read of it.)
Development Environment
Lets jump into it. Tools, tools and more tools. Working with web technologies requires constant learning of programming languages, tools, and workflows. The only constant is change. Especially to existing and widely used code bases (ie. anything open source). In this field you never stop learning and you are always practicing.
- Text Editors
- TextEdit - Default editor on MacOS
- Atom - Free editor by Github
- Atom Packages
- Atom Flight Manual
- My Atom Setup - Includes list of packages I have installed.
- Visual Studio Code (VSCode) - Free editor by Microsoft
- Terminal
- How I use terminal (themes, .bash_profile, etc)
- Learning Terminal
- Git - Version control tool
- Github - Website that hosts git repositories
- Node.js / npm
- Local Development Server - There are several ways to work with a local web server. Some are simpler than others to setup and configure. Its mostly a matter of personal preference and project preference which local web server option you use. You can refer to the cm-code/live-servers repo for simple examples.
- Chrome Browser
- Chrome Dev Tools (Inspector for debugging). Access via: View > Developer > Developer Tools within Chrome.
Languages
In the resources here you can find some learning pathways for building skills with these tools. Make time to read through the basics of all the languages and try things out. Most importantly, seek to apply the skills you are learning towards projects.
Node.js
We will only talk about Node.js briefly in order to install Node and npm. We will go deeper into how it works in the weeks ahead.
In Class Examples
We will work through these things in class so you have a good foundation to experiment with web languages.
- Terminal
- Location on MacOS: Applications/Utilities/Terminal.app
- Whats the difference between terminal applications (/usr/bin) and MacOS .app applications?
- How do you display hidden files on MacOS? Look here
- Customize your Terminal in Terminal > Preferences. It helps to make the text larger on most screens.
- Common commands:
cd, ls, mkdir, rmdir, rm, mv, cp, pwd, man, touch. Think of all these commands as tiny applications that have no GUI. They are very old and have been around since the start of Unix based systems (Read this to learn more: Looking back at OS X's origins). Look at MacOS/Linux/Unix Command Line Cheat Sheet to see more information about common commands. - Working with directories and files:
cd <folder>- Goto into a foldercd ..- Go up one levelcd ../<folder>- Go up one level (to parent folder) and into a child foldercd ../..- Go up two levels etc- Tab completion - When you start typing in a terminal you can hit tab to complete the command if the file or folder you are going to use is available. If you hit Tab twice, you will see the contents of a folder.
- Git
- You will likely not have Git installed on your machine. You will know if you have it or not when you type
gitinto the Terminal. You may be prompted to install XCode Developer Tools in doing so. You have two options to install git: Install the XCode Developer tools or download the installer from git-scm. - After installing it the
gitcommand should work in the Terminal.
- You will likely not have Git installed on your machine. You will know if you have it or not when you type
- Github Workflow
- Make Repo on Github. If you check the box to add a README file it will include a README.md file in the repo. This is the main information file shown when you goto the repo URL. Markdown = text file with special syntax that gets converted into HTML. Review Markdown Cheatsheet.
- Command Line Cheat Sheet by git-tower - This one is great!
- Clone Repo:
git clone <repo url>. For Example,git clone git@github.com:rjduran/cm-sandbox.git. Note the URL and its use of "git" or "https". Use "https" to start. You need to go through the Github tutorial below to connect to Github via SSH. - Make some changes: (Using text editor of some kind - Atom, vi, TextEdit, notepad)
- Stage the changes:
git add index.html - Commit the changes:
git commit -m "my message describing changes" - Push the changes:
git push - Pro tip: After setting up your Github account, read through Connecting to Github with SSH to setup your system to connect securely to Github and not require you to enter your username and password credentials each time you push changes.
- Download and install Node.js, npm, and live-server (Step 1 of assignment below).
Places to look to for help
- Stackoverflow - The most used development community / forum. At some point you will use this. Its a great place to ask good questions and answer things you know about.
Assignment 2: Build a Sandbox
Create a local development workspace (aka sandbox) to prototype with HTML, CSS, and JS. By the end of this you should have something that looks like my cm-sandbox repo.
What is the purpose of this?
To become familiar with the file types, languages, and how they work together. At a fundamental level this approach to experimentation establishes good development practices and efficient workflows. It also supports hands-on learning, which is the only way to improve as a programmer. As a programmer you want to be in control of your code, tools, workflow, and system. (Don't let the computer control you.).
Tip
Pro Tip: Setup a working directory for all programming projects (For Example, /Users/username/code). This directory then becomes your goto location for anything having to do with code, programming, cloning repos from github, experimenting with new tools and software, and more. This is precisely how I organize my system.
- Download and install Node.js and live-server. (we will do this part in class).
- Verify node and npm are installed via Terminal:
node -v && npm -v. You should see two version numbers matching what you installed. - Install
live-serverglobally:npm install -g live-server - If you have done all this correctly you should be able to download a zip of (or clone the) cm-code git repo and run the hello-live-server example via Terminal.
- Verify node and npm are installed via Terminal:
- Create a Github account and make a repository for your web project (as demonstrated in class). You can name the repo anything you want. For example, "cm-sandbox".
- Clone a copy of this repository to your machine via Terminal.
git clone <repo-url>. - Setup your machine to make use of a local development folder and local development server (See tip above and Step 1).
- Create 3 files in your web project repository folder (ie. the project "folder" or "repo" you created and then cloned from Github in step 3).
- index.html - (quick boilerplate)
- style.css
- script.js
- Launch your local development server (
live-server) and code editor of choice (ex. Atom or VSCode) and make some changes to the files in your web project. Remember the purpose of a local development environment is to "simulate" how the code will perform when uploaded to another web server.- Create a basic html page using validated markup (Hint: Using a tool like FreeFormatter, check that your code works as expected.)
- Add some css selectors to your style.css file.
- Optional: Add some basic Javascript functionality to your script.js file.
- Commit the file changes to your Github repo. Note your repo URL and include it in your post.
Deliverables:
- A 1 min video screen capture demonstrating your sandbox environment and development folder structure. Include a link to your Github repo and embed the video in your blog post. Share the URL to your post on slack #cmstudio. Look into using a screen capture tool such as Screencast-o-matic to document your workflow. Upload your video to youtube or vimeo.
- Optional (but highly recommended): A writeup on your blog about your learning experience. What hurdles did you encounter and how did you overcome them? What worked and what didn't? What new tools did you try? How would you explain what you've done to someone that doesn't know anything about web development and the tools used?
CM1 [Tues]: Due Sept 11
CM2 [Wed]: Due Sept 12
Resources:
- Version Control (Git / Github)
- Github Tutorial (10 mins) - Non command line (Terminal) tutorial.
- Git - The Simple Guide - Command line based tutorial.
- Connecting to Github with SSH
- Git & Github Tutorial on Udacity - Command line based tutorial.
- Start a new git repository
- git/github guide a minimal tutorial
- The most important git commands
- Git Immersion - Advanced Tutorial. Work through this once you get the hang of working on the command line.
- Command Line Cheat Sheet by git-tower - This one is great!
- Version Control Workflow Cheat Sheet for Git (git0tower)
- Terminal
- Learning Terminal - A learning pathway for beginners
- How to use Terminal on Mac, How to use a Terminal on Windows
- MacOS/Linux/Unix Command Line Cheat Sheet, Mac Terminal Cheat Sheet, Another Cheat Sheet
- How to show hidden files and folders including ~/Library on a Mac - The benefit of doing this is you can see whats actually on your machine. By default, MacOS and Windows systems hide lots of stuff. To be a master of your machine(s) you need to begin learning whats hidden just under the surface.
- Markdown
- Mastering Markdown
- Markdown Docs
- Markdown Cheatsheet
- How to write a great README for your GitHub project - These are only examples. Not all projects need every detail in the readme as described. The contents of a readme really depend on the type of project and audience. In general, its good to enable someone else to download and run your code if you are sharing it to Github.
- Awesome README - A massive list of README examples and resources.
Week 3: Web Development II
Sept 11 / Sept 12
- Terminal Review
- Git/Github Review
- What are the steps to working with a git repo? (Hint: Look at the Github Workflow (above) in the notes from last week.)
- How else can you use git repos? Do you need to use Github?
- Web Development 101
- Web Languages (HTML/CSS/JS)
- Responsive Development - Desktop/Mobile, Media Queries, CSS/JS Frameworks, etc
- Daily CSS Design
In Class Examples
Question: How do you go about building a website or web application from scratch?
In general, the process and timeline from idea to a functioning live site that matches the needs of all parties (client / users / etc) can vary greatly based on a host of factors such as design cycles, development timelines, paying/non-paying clients, branding, UX research, site complexity, money, and more. On top of that, all design / development shops, agencies, freelancers and any creative parties involved with the process typically have their own way of working. There are different standards adopted or created by the various parties and it's common for some tool sets to change project by project and year by year. In many ways, it's still such a craft and creative process to bring websites and applications to life. To better understand the process, these are a few questions you may want to ask when starting:
- Decide what you are going to build.
- What is the idea?
- What will the website (or application) do?
- What is it's purpose?
- Who is it for?
- What kind of website it it? Ecommerce? Personal? Portfolio? Blog? Album? Game? Social Media Platform? (Again, whats the purpose of it?)
- What does it look like?
- Branding? UX?
- Sketch, sketch, and more sketching (like on paper or wireframe tools or Sketch)
- Decide how you are going to build it.
- What tools will you need to use to realize the idea?
- What is the domain?
- Where is it hosted?
- Build from ground up or use a theme or template?
- What CSS and/or JS libraries will be used (if any)?
- To CMS or not to CMS?
- Decide how a person may use it.
- Who is the audience?
- What platforms will it be accessed on? This will influence what the tech needs are.
- Decide what kind of content it has. Or at least what content will be aggregated over time.
- Give all relevant content a place.
- What kind of data is collected and used?
- Timeline
- What's the timeline from start to finish? Is a website ever finished?
- Money -- What's your time worth?
- What happens after the site is live? Maintenance cycles?
There are probably other things to consider but this is a good starter list. Here's an article that really distills it down a bit -- How to Make a Website in 2018. As you progress in your understanding about web design and development, think about the questions that come up for you and how you might proceed.
Lets make something!
You now (should) have a development environment to test HTML, CSS, and Javascript. If you don't, review what we did last week and/or clone my sandbox environment from github.
At a basic level all you need is a single index.html file to render a webpage. All the CSS and JS you may have can exist inside the same file embedded within <style>...</style> and <script>...</script> elements. It only becomes important to separate the 3 types of code when a project becomes too large to manage within a single file. Best practices, modularity, and the need for regular maintenance have led developers towards a current approach of establishing and using style guides or coding standards.
Lets play with some HTML and CSS in our live-server based environment.
Example: Add some code to your Github project (repo)
- Clone your project from Github (Terminal)
- Open the project folder in Atom (text editor)
- Make some changes to the index.html file in Atom. Save the file.
- Add and Commit the changes to your repo with a message (
git add index.htmlandgit commit -m "my message about the changes") - Push the changes to the Github. (
git push) - Repeat
What does each file type consist of?
- HTML = Document Structure
- CSS = Visual Identity
- JS = Interactivity (We will get more into this next week)
Questions:
- How do you define document structure with HTML h1, h2, p, ul, li, div elements?
- What are CSS selectors and how do they relate to HTML elements?
- What is the difference between embedded and linked CSS and how do you use both types?
git clone https://github.com/rjduran/cm-grid-project.git
-
Project 1: Building Hypertexts
Design and build a hypertextual storytelling experience (aka a website) that allows the user to make a series of choices leading them down a rabbit hole of possibilities. It's up to you how your experience begins, progresses and ends, if it ends at all, or if its something that can be experienced forever. Note the word game is used loosely below.
Implementation:
- Develop a storyline / narrative to base your experience or game on. It doesn't have to be extremely complex. If you are having trouble with this part, try out a storyline generator tool and start sketching it out. Think about other web based experiences you have encountered and how you navigated through the information presented.
- Read the 1st chapter of the book Finite and Infinite Games by James Carse (pdf). It's awesome.
- Construct navigation pathways through your storyline using any number of linked pages. Hint: This is essential a Hypertext based experience. This is why HTML is called Hyper-Text Markup Language. It is the defacto standard for building connections between information objects.
- There should be some kind of main home page (index.html) that displays options for a user to choose from.
- Each subsequent page will present further options while guiding the user down a path from start to finish. Where the user ends up is up to you.
- When thinking about a game as the type of experience being put forth, here are a few examples of adventure games where the user has choices to make that determine the outcome (win / lose / infinite play / no outcome). Don't worry, these are just examples. I don't expect you to build a fully developed 3d world or program anything as complex as these games are. Stick with simple HTML pages that link together.
- Zork I
- Oregon Trail
- Myst
- Everything - Feat Alan Watts
- Sim City
- Create your own adventure game (HTML) This one is the most like what I would expect you build from a functional perspective. Although I bet you can do it in a much more visually pleasing way.
- Establish a simple visual language and implement it in CSS -- color, typography, images, layouts, etc. If you have a hard time with color palettes, explore some color palette tools. You may also choose to make something entirely image driven, in this case, explore whats possible visually with images -- dimensions, color, contrast, etc.
- A page can consist of any type of content you want to tell the story or provide clues for a user to make a choice. Basically every choice someone makes will be a link to another html file.
- Possible content: quotes, video, text, images, gifs, animations, graphics, sounds, interactive elements (via p5.js)
- This is all possible without using Javascript (unless you are using p5.js for any part of it). Your website (game) could be built using entirely HTML and CSS.
- Organize your CSS into one or more files to make use of the styles across each html file.
- Explore the use of Grid and Flexbox layouts (see resources below).
- Feel free to explore any CSS libraries that deal with animations and interactivity (see resources below).
- Keep it simple. Have fun!
Deliverables:
- A 2-3 min video screen capture demonstrating your project in action. It can be running in your local server to demonstrate or you can upload it to a server and provide the URL. Create a Github repo for the project so others can clone it and try it out on their systems. Include a link to your Github repo and embed the video in your blog post. Share the URL to your post on slack #cmstudio. Look into using a screen capture tool such as Screencast-o-matic to document your workflow. Upload your video to youtube or vimeo.
- A writeup on your blog about your learning experience. What hurdles did you encounter and how did you overcome them? What worked and what didn't? What new tools did you try?
CM1 [Tues]: Due by 11:59pm Sept 18
CM2 [Wed]: Due by 11:59pm Sept 19
Resources:
Tools - Visual, Sound, Animation
- The web design process: creating the visual design
- Tone Generator Tool
- Animated GIFs
- Animate.css
- Flapper
- Font Awesome, Font Awesome Cheat Sheet - For easily adding icons to HTML elements
- Top 9 Animation Libraries
- Easing Functions Cheat Sheet
- Anime.js
- Twine - Twine is an open-source tool for telling interactive, nonlinear stories
Inspiration
Grid and Flexbox
- Understanding the CSS Box Model
- The New Layout Standard For The Web: CSS Grid, Flexbox And Box Alignment
- How To Approach CSS layouts in 2017 — and beyond.
- Don’t Overthink It Grids
- The ultimate CSS battle: Grid vs Flexbox
- How to Efficiently Master the CSS Grid — in a Jiffy
Grid Layouts / Tools
- Realizing common layouts using CSS Grid Layout
- Grid by Example
- Interactive Flexbox Cheat Sheet
- Interactive Grid Cheat Sheet
Phase 2: Web Applications, Libraries, Frameworks

Week 4: Computational Thinking, Javascript I
Sept 18 / Sept 19
- Project 1 Due by 11:59pm. Submit via #cmstudio. I'd like for everyone to try out each others projects. Clone each project repos and play with them. See Part 2 of Assignment 3.
- Questions on workflow and tools?
- My Atom Setup
- I've been starting to use VSCode more lately because of automatic code completion for almost any language I use. It's especially nice for Javascript out of the box.
Computational Thinking
Computational thinking is the thought process involved in formulating a problem and expressing its solution(s) in such a way that a computer—human or machine—can effectively carry out. (Wikipedia)
Question: How does one think like a programmer or computer scientist?
- How to think like a programmer — lessons in problem solving
- Exploring Computational Thinking by Google - Read this overview.
- How can I learn to think like a computer programmer? - Read through the first response.
- What is Pseudocode?
Question: How can I get better at programming / thinking / making / problem solving this way?
- Lots of practice. Look to solve as many problems as you can using programming (and in the process practice computational thinking).
- Try out as many different languages, libraries and frameworks as you can.
- Read books. Read / work through tutorials. Watch videos. Think about what kind of learner you are and how you navigate resources when learning new skills. Start with the resources in Learning Javascript.
Related to the above discussion about programming and such, here are a few things to read if you are concerned with needing to have a strong background in math to accomplish anything with Javascript or another programming language. I hope this also addresses the question of "What amount and kind of math would you need to use to improve as a programmer?" And I use the word "improve" because its a practice like other forms of making and creativity. Which takes time to practice and master.
- You Don't Have to Be Good at Math to Learn to Code
- Learning to code: do I need to be good at maths?
- "How much math do I need to know to program?"" Not That Much, Actually.
- Does Math Help Programming Or Programming Help Math?
Javascript
JavaScript is a programming language for the web. It makes things interactive and fun!
Question: When should Javascript be used?
I hope some of these articles begin to paint the picture of why and when you would use Javascript.
- You Know You Should Use JavaScript When…
- The Five Top Reasons to Use JavaScript
- When do developers use JavaScript and why?
- Choosing Programming Languages: The Right Tool For The Job (C#, Python, Node.js)
Question: How to use JS with HTML / CSS?
- Put it inside a
<script>tag within the<head>tag inside your index.html file.- Placement in
<head>tag vs the end of<body>tag.
- Placement in
- Embedded vs Linked (ie. JS code inside a script tag or in a linked script.js file).
- Linked:
<script type="text/javascript" src="script.js"></script>
- Linked:
Question: How can I work interactively with it and within the browser?
- Chrome Developer Tools > Console and
console.log()are your best friend when debugging JS code. - Here is a great intro tutorial explaining how and why to use the console. How To Use the JavaScript Developer Console
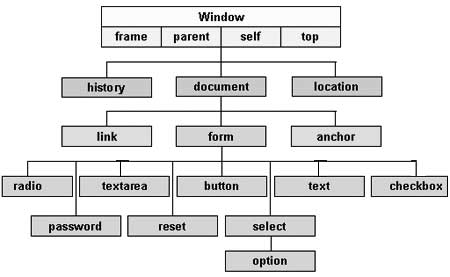
The DOM is a standard object model and programming interface created by the browser when a webpage is loaded. It is essentially your HTML page but in a different format now accessible through a browser based programming interface and language (Javascript). In general, JS can manipulate (get, change, add, delete) any part of the DOM.
Here's a great image of the DOM
Try opening the Chrome Developer Console and typing document or window. What does it return? How does it relate to the DOM image above?
Some things you can use JS for:
- Change / Remove HTML elements in the DOM / on the page
- Change and add CSS styles to elements
- Read and change element attributes (href, src, alt, and more)
- Create new HTML elements and insert them into the DOM / page
- Attach event listeners to elements (click, keypress, submit)
Language Fundamentals
The language has many built in Objects that contain methods (aka functions) and properties. We will talk more about Objects next week so you don't need to know much about them yet. Just know that everything you get a reference to in Javascript is essentially an Object of some kind and contains data in the form of Key-Value pairs. The reference below is a great place to go to look up how new types of Objects work.
Before attempting the assignment below, work through the videos in the following playlist. It will provide more guided practice in the JS language and will cover the topics above. The playlist totals about 2 hrs in duration if you go through them all with an average video length of 6 mins.
JavaScript DOM Tutorial Series (Video Playlist)
Assignment 3: Javascripting
Tip
Pro Tip 1: Clone your cm-sandbox repo as a starting point or create a new repo (project) on Github then clone that repo. See instructions here for cloning a repo into a folder with a different name. If you make a new project folder to work out of you need to setup the same basic files as before -- index.html, style.css, and script.js. (Do you see the time-saving benefit of setting up a project "template" to start from?)
Pro Tip 2: The Chrome Developer Tools > Console and console.log() are your best friend when debugging JS code.
This assignment consists of two parts:
Part 1: Using this repo as a starting point, write some code that allows you to get familiar with the interplay of JS and HTML by inspecting and manipulating the DOM in the following ways. Note all the code you enter can be placed in the script section of the index.html file at the end of the body tag. Alternatively, you can use a linked script.js file.
After setting up your project environment and launching a live server in the folder, open the Chrome Developer tools Console and enter: document. You will get a representation of the entire HTML document as an object. The document object is the top level object in the DOM.
Read through this list of Properties and Methods to begin understanding what is available within the console and use this as a reference for the following tasks.
Getting Elements
- Get a reference to all the paragraph (p) tags in the document.
Hint: Look atgetElementsByTagName() - Get a reference to a paragraph tag with a specific id of "second".
Hint: Look atgetElementById() - Get a reference to a all paragraph tags with a class of "first".
Hint: Look atgetElementsByClassName() - Get a reference to an element or elements within another element. For example, if you have an unordered list (ul) with several list items (li), how do you select a specific li and display it's contents to the console?
Changing Elements
- Change the text within the previously selected list item (li) to "Greetings List Item! I'm a string from another planet!".
- Change the text of a specific paragraph to a different string of text. Use an Ipsum generator tool to create new placeholder text that you insert using Javascript.
Removing Elements
- Clear the contents of the paragraph with an id of "empty-me".
- Clear the contents of the set of paragraphs with class "empty-us".
- Remove the div with a specific id of "section3".
Adding Elements
- Create a new anchor tag that links to your blog and insert it just after the paragraph tag in the div with an id of "about".
- Append a new div anywhere in the document and give it an id of your choice. Insert a paragraph with some content into the div using javascript.
- Add a new list item to the sidebar ul that links to your new div so you can click and scroll to it.
Event Listeners
- Make an event listener for any h2 element that triggers an
alert()when you click it. Set the alert message to "Hey Hey Hey!". - Make an event listener that triggers a change in the text of a specific paragraph with the id "change-me".
Part 2: Clone and analyze a classmates Project 1 results and formulate a list of 3-5 questions about things you notice it does or doesn't do that you might want or expect it to do based on the subject matter. What questions arise about the functionality, user experience, interactivity? Where do you see room for improvement with Javascript? For example, could it use animation or transitions between visual elements or pages? What might an alternative navigation structure look like? Would you need a different interface design for different types of users and/or device types?
You can think of these questions as problems you want or need to solve potentially using JS. Some solutions may be CSS or content based. Include this list along with the project chosen to critique in your blog post writeup. If you can see how JS might begin to address some of your questions, describe the steps you would take to solve the problem. You don't need to write any code to implement solutions for this part unless you want to and are motivated to do so.
Deliverables:
-
A blog post containing a brief writeup for both parts and a link to your Github repo containing your Javascript explorations from Part 1. Include a short description in the README.md file of the repo with any specifics about the code you experimented with. Look at the Markdown resources for Week 2 if you haven't used the Markdown language yet.
-
Share the URL to your post on slack #cmstudio.
CM1 [Tues]: Due Sept 25
CM2 [Wed]: Due Sept 26
Resources:
- Students - A list of everyone in class and their websites and github accounts.
The Console
The DOM
- What is the DOM? (Video)
- The HTML DOM
- Core Interfaces in the DOM
- Document Object Properties and Methods
- DOM Tree Visualization Example on CodePen
Language
- Javascript.com by Pluralsignt
- Javascript Basics (P5.js Wiki Reference) - This is a great quick-ish overview of the JS language and how to use it in general and in combination with a great creative coding library called p5.js.
- Javascript Reference
Examples
- W3 How-To Examples - A great set of how-to examples for various web topics.
- CSS Navigation Bars - This is what the cm-javascripting code is based on.
Week 5: Javascript II
Sept 25 / Sept 26
This week: CM Work Session - Friday, Sept 28 9am - 12pm. I'll be at the studio for anyone that needs extra help on assignments and projects.
JS Week 4 Review
- JS DOM Tutorial - Bookorama App (by Net Ninja)
- Your workflow. What's new?
- Questions about JS in general, tools, etc
Creative Coding
Creative Coding is a type of computer programming in which the goal is to create something expressive instead of something functional. It is used to create live visuals and for VJing, as well as creating visual art and design, art installations, projections and projection mapping, sound art, advertising, product prototypes, and much more. (Source: Wikipedia)
- Tim Rodenbroeker - Designer / Programmer exploring branding w/ code
- WOVNS - Digital Fabrics Platform
- Nervous System
- What is creative coding? - Bite size intro to creative coding and generative design
- Dan Shiffman - Codeland - Creative Coding: An art and code showcase - NYC 2017 - Great overview of a bunch of creative coding / media arts projects built using Processing.
- Awesome Creative Coding - Carefully curated list of awesome creative coding resources primarily for beginners/intermediates.
- If you are interested in these topics, check out some more resources from Critical Making Fall 2017.
Interactivity
Events & Event Listeners
- How to work with events - Element changes, Key presses, Mouse movements
- Events and the DOM
- cm-javascripting
- JS Timing Events - Learn more here about how to make events that trigger in time.
More Language Fundamentals
- What are functions and how do they work?
Example:
1 2 3 4 5 | function sayHello() { console.log("hello"); } sayHello(); // Call the function. Prints "hello" |
Example of a function with return type:
1 2 3 4 5 6 7 | function add(a, b) { return a+b; } var a = 1; var b = 3; var c = add(a, b); // results in c = 4 |
-
What are Objects and how do they work?
-
Debugging: Using typeof.
typeof "a string" - Objects Quick Reference
- JavaScript Object Notation (JSON) - A syntax for storing and exchanging data.
- Javascript Built-In Object Reference
- Eloquent Javascript - This is a great book to learn more about the language and how to use Objects.
Examples:
1 2 3 4 5 6 7 8 9 10 11 12 13 14 15 16 17 18 19 20 21 22 | // empty object var obj = {}; // object with three key/value pairs var obj = { 1: "A", 2: "B", 3: "C" }; // object with three string key/value pairs var obj = { "A": "Letter A", "B": "Letter B", "c": "Letter c" }; // object with two objects within it var obj = { "A": { 1: "my first object"}, "B": { 1: "my second object"} }; |
-
What are Arrays and how do they work?
- Array vs Set vs Map vs Object — Real-time use cases in Javascript (ES6/ES7)
Examples:
1 2 3 4 5 6 7 8 9 10 11 12 13 14 15 16 17 18 19 20 21 22 23 24 | // empty array var myArray = []; // array with 3 integer values in it var myArray = [1, 2, 3]; // array with 3 string values in it var myArray = ["critical", "making", "studio"]; // array with 3 objects in it. Each object contains two key/value pairs. var myArray = [ { "A": "letter A", "B": "letter B" }, { 1: "yes", 2: "no" }, { "firstName": "daft", "lastName": "punk" } ]; |
JS Libraries and Frameworks
Library
A library is a collection of code containing objects, functions, and methods that you can use in an application or project.
Examples:
- jQuery - Library for simplifying front-end / client-side Javascript.
- p5.js - Library for creating 2D/3D interactive browser based experiences.
- Three.js - Three.js is a cross-browser JavaScript library and Application Programming Interface used to create and display animated 3D computer graphics in a web browser. Three.js uses WebGL.
- A-Frame - A web framework for building virtual reality experiences. Uses Three.js under the hood.
- D3.js - Data Visualization Library
Framework
A framework can be everything you use in application development. It can be a library, a collection of many libraries, a collection of scripts, or any piece of software you need to create your application. Framework is just a very vague term. It's best to think about a framework as something that is mostly ready to use out of the box. Just add content and configure it to work.
Examples:
Discussion: Library vs Framework
Examples / Work Session
- Using jQuery with the DOM
- Setup a index.html file to use jQuery
- How to target elements using jQuery?
- How to handle events using jQuery?
- Using p5.js - Work through Getting Started and Pick a few examples to get familiar with. Set them up in a sandbox directory to experiment.
Assignment 4: Interactive and Dynamic Javascripting
Choose one option:
Option 1:
Build an interactive and dynamic website using "vanilla" Javascript or a helper library such as jQuery. Use your Project 1 code as a starting point or start from scratch with a different concept. Perhaps your final project concept will require interactive and dynamic elements -- identity those elements and work on coding some of them using JS. Take this opportunity to gain an understanding of how to build interactive and dynamic features into your website experience.
Option 2:
Build a browser-based experiment using a 2D/3D Javascript library such as p5.js or three.js. Choose to start from scratch or use the examples are a starting point (this is why they exist!). Mash up a few examples and see what you end up with.
Deliverables:
-
A blog post containing a brief writeup for your project or experiment. Include in your writeup any hurdles you encountered and how you overcame them? What worked and what didn't? What new tools did you try? Be sure to include a github repo to any code you worked on with instructions for its use in the README.md file.
Use a screen capture tool such as Screencast-o-matic to document your workflow / demo your project. Upload your video to youtube or vimeo and embed in your post. Using a screen capture tool is one of the best methods for sharing interactive and dynamic experiences.
-
Share the URL to your post on slack #cmstudio.
CM1 [Tues]: Due Oct 2
CM2 [Wed]: Due Oct 3
Resources
- Eloquent Javascript - This is a great book to learn more about JS language fundamentals. Read Ch 1-6 and Ch 13-15 to review and go deeper into the concepts we've touched on this phase.
- jQuery CDN
- Draggable.js - A fun JS library we found during class that makes dragging things fun.
- chrome experiments - Various JS libraries and experiments built with JS
- JS Timing Events
- Programming Terminology - A Wikipedia for Programming, Computer Science, and Much More. Don't know a term? Look here.
- Templating Engines / Languages - I mentioned Pug.js and Handlebars.js.
Week 6: Node.js
Oct 2 / Oct 3
JS Week 5 Review
- Share your assignment 4
- Your workflow. What's new?
- Questions about JS in general, tools, etc
Node.js
Node.js is a platform built on Chrome's JavaScript runtime for easily building fast and scalable network applications. Node.js uses an event-driven, non-blocking I/O model that makes it lightweight and efficient, perfect for data-intensive real-time applications that run across distributed devices.
Node.js is an open source, cross-platform runtime environment for developing server-side and networking applications. Node.js applications are written in JavaScript, and can be run within the Node.js runtime on OS X, Microsoft Windows, and Linux. Node.js also provides a rich library of various JavaScript modules which simplifies the development of web applications using Node.js to a great extent. (Node.js Introduction - Tutorials Point)
Node.js = Runtime Environment + JavaScript Library
Ok... So what is Node REALLY doing?
In short, Node replaces the functionality of a server. This essentially means you can build your own custom server to process requests and serve responses any way you want. Cool eh!?
Some common applications of Node.js are a blogging platforms (Medium), Project Management / Note Taking (Trello), Chat Applications (Slack), Text Editors (Atom, VSCode) Collaborative Document Editing (Similar to Google Docs), Static Site Generators, Building Command Line Tools, Real-time Data Monitoring Systems, building APIs, handling authentication server-side, and more!
Server Overview
- What’s the cloud?
- Client/Server Relations
- Whats a Request?
- Whats a Response?
Install Node.js
FYI: We did this in Week 2. You don't need to do it again. If you haven't done it, do it before class.
- Download LTS pkg and run the installer.
- When installer is complete, open Terminal and type
node -v. You will see a version number matching what you downloaded. - Type
npm -vand you will see a npm version number as well. You're ready to go!
What is Node.js and what can you do with it?
- Why The Hell Would I Use Node.js? A Case-by-Case Tutorial
- What exactly is Node.js?
- What is Node.js? The JavaScript runtime explained
- 10 Reasons to Use Node.js
- 10 best Node.js App Examples / 12 Apps Written with Node.js
- tl;dr: Paypal, Netflix, Trello, Uber, LinkedIn, Walmart, Ebay, Medium, Groupon, NASA, Yahoo, Mozilla, and more
What does a basic application look like with Node?
How does it work?
- Understanding the package.json file
- Setup a Node project and pacakge file with
npm initornpm init -y. - The node_modules folder
- Setup a Node project and pacakge file with
- What is
npm?- Global vs local install.
npm install -g <packagename>vsnpm install <packagename>
- Global vs local install.
- How to run a Node app?
node app.js - Pro Tip: As you begin working on a Node application you likely notice that you need to constantly stop and restart the node runtime via terminal. Wouldn't it be nice if there was a tool to do this for you automagically? There is! It's called nodemon. Just type
npm install nodemon -gto install and run your app by usingnodemon app.js.
Getting started with Node
Feel free to work through these exercises to get a better understanding of the pieces of npm and node. To dig deeper, explore the learning node section and work through the tutorials.
- hello-npm
- hello-node
- hello-p5 - This makes use of Node.js to serve a p5.js sketch. This is similar to running
live-serverin a folder with a p5.js sketch in it.
Express is a minimal and flexible Node.js web application framework that provides a robust set of features for web and mobile applications.
To Install: npm install express
- What is Express.js and what can I do with it?
- What does a basic application look like with Express?
- How does it work?
- Getting started with Express
Applications of Node
Node can be used to build web applications that connect various types of digital technologies together. For example, browser based VR experiences + physical hardware sensors and devices, inter-application communication, chat servers, connected magic mirror and mobile devices, and more.
- Building smart, connected and distributed devices (IoT)
- Connected VR Experiences (Node.js + Express + Unity)
- WebVR Experiences (A-Frame + Node.js + Express)
- Connected Drawing Application (P5.js + Node.js + Express)
- Connected Digital-Physical Experiences (Physical (Hardware + Sensors) + Digital and Immersive (A-Frame or Unity))
- Robots! Drones (Skycatch / Drones, Data and Node.js: A Skycatch Story)!
- Static Site Generators
Project 2: Build an Ipsum Generator
Using this tutorial as a starting point, build your very own "Lorem Ipsum" Generator application using Node.js and Express.
Implementation:
- Choose a subject matter that interests you as a basis for your generator. It can be as practical or eccentric as you like.
- Your work should include and extend the main functionality covered in tutorial in some way. For example, you might choose to focus on implementing a responsive layout using media queries, adding to the form element and writing some JavaScript to process the combination of new options, or explore interactivity through event listeners with or without helper libraries.
- Establish basic visual styles that support the concept. Explore typefaces, color palettes, layouts, and images.
- Explore creative ways of styling the form and generated text.
- You may choose to make the site responsive using CSS media queries to deliver an exceptional user experience across mobile and desktop devices.
- Attempt to use front-end Javascript using jQuery or jQuery UI to manage interactive and dynamic elements. You may also use a CSS library such as Animate.css, Hover.css, or similar JS libraries such as Anime.js, Bounce.js, or Animsition to help integrate animations and transitions of elements or pages if your concept requires it.
- Inspect other types of Ipsum generators to see how they work. What features, beyond choosing # paragraphs to generate, do you notice?
- Here are a few examples: Samuel L Jackson Lorem Ipsum, Khaled Ipsum, Harder Better Faster Ipsum, Gangsta Lorem ipsum, Wikipsum, HTML-ipsum, JS Ipsum, and many more.
- Explore other form elements such as checkboxes and drop down input elements as options for customizing the text that gets generated. Hint: Look at the Samuel L Jackson Lorem Ipsum generator and see whats added when toggling on/off the options. Notice that as you are working with strings of text, it's possible to include other types of strings of text that happen to also be html tags.
- Is a lorem ipsum generator limited to generating only text? I think not! (Hint: Check out Lorem Picsum). What else could you think to do with this kind of tool?
- Your application should reside in a dedicated Github repository that can be cloned by anyone. Inspect the file and folder structure found in shia-ipsum as an example. Be sure to include a README.md with instructions about how to run your application given a basic understanding of the Terminal, Node.js, and npm. Also, be sure to inspect the .gitignore file. The purpose of this file is to tell git which files or folders to ignore in a project. You want to be sure to add the node_modules folder to this ignore file. You never want to commit the node_modules folder to a repo since it contains all the source files for any modules you are using in a project, which can cause the repo to be extremely large. Github has issues with very large repos and will let you know if you are above their limit or just disable your Github account. A .DS_Store file is another unnecessary file to commit to a repo. Not as critical but not needed for anything.
- Optional: It's not required but if you are interested in deploying a Node.js application on a server for other people to access with a dedicated domain, you can read more about how to do this in Application Deployment section of Learning Node.js. This is a more advanced workflow so be prepared to spend some time with it. Once you go through it however you should have a much better understanding of how servers are setup and how they work.
Deliverables:
- A 2-3 min video screen capture demonstrating your project in action. It can be running locally to demonstrate or you can deploy it to a host like Heroku or Digital Ocean and provide the URL. Embed the video using either Youtube or Vimeo in your blog post.
- Create a Github repo for the project so others can clone it and try it out on their systems. Include a link to your Github repo in your blog post.
- A writeup on your blog about your learning experience and creative process.
- What hurdles did you encounter and how did you overcome them?
- What worked and what didn't?
- What new tools or techniques (ie. commenting code) did you try or practice?
Share the URL to your post on slack #cmstudio.
CM1 [Tues]: Due by 11:59pm Oct 9
CM2 [Wed]: Due by 11:59pm Oct 10
References
- Shiffman Tutorial: Server-side Programming and Node - This is a great intro and review in most of these topics (Node, Express, npm).
- HTML Form Elements
- RESTful API
- CRUD
- Express.js Documentation
- 11 JavaScript Animation Libraries For 2018
- Node.js URL Module: URL Strings and URL Objects - This has a great diagram showing the URL structure and how to parse it using the Node.js API. This matters for routing a request to the correct destination in your Node server (app).
- gitignore file generator - Useful tool for creating .gitignore files.
Phase 3: From CAD to CAM
 Source: 7 Days, 700 Pens: Parametric Design for Customized Conference Swag by Formlabs
Week 7: Intro to CAD / Fusion 360
Oct 9 / Oct 10
Project 2 Review / Critique
- Submit deliverables by 11:59 pm on #cmstudio in Slack
Intro to CAD and Modeling
Overview
- A short history of sketching and blueprints. What happened before computers? Vintage Photos: Life Before AutoCAD
- What is CAD and why do we use it to make things?
- What kinds of things are possible with CAD? (Hint: Look around. What do you see? Almost everything in our human built environment is made using an industrialized CAD/CAM process.)
- CAD vs CAM (We're working towards this in Phase 4)
- CAD = Computer-Aided Design (Input: Idea for 3D model; Output: 3D model and instructions for CAM.)
- CAM = Computer-Aided Manufacturing (Input: Toolpath file / instructions; Output: Physical Object)
Types of CAD
- 2D - Adobe Illustrator, Photoshop, etc
- 3D - Fusion 360, Autocad, Inventor, Solidworks, Rhino, etc
- Direct vs Parametric
- What’s the Difference Between Parametric and Direct Modeling?
- So what makes a model "parametric"? With a parametric model you have the ability manipulate it's geometry with any number of dimensional parameters (ie. Width, Height, Length, etc).
- Rhino vs Fusion 360
- Whats the difference between these tools? The Workflow and Feature Set.
- Some related topics that result in a 3D model (Mesh):
- 3D Scanning
- Photogrammetry
- Data Driven
- Constructive Solid Geometry
- fMRI, CT (Medical Imaging)
- Confocal, etc (Biological Imaging)
Fusion 360 Workshop
Download & Install
- Fusion 360 Students Download - Free for students. Make an Autodesk account and install.
- Fusion will be automatically placed in the macOS dock as a shortcut after install.
The Basics
- The Interface
- Workspaces, Tools, Navigation, Movement, Projects
- Model Hierarchy (Browser)
- Timeline (Model History)
- Making Sketches
- Defining Constraints
- A Guide to Fusion 360 Sketch Constraints - A great set of videos for each constraint type.
- A List of Constraint Types
- Dimensioning a Sketch
- Fully Defining a Sketch
- Pro Tip: Anything "Blue" is not dimensioned which means it can be moved around. Anything "Black" is dimensioned which mean is has a size. Once the whole sketch is Black it is "Fully Dimensioned." This means it's "locked" into place.
- Defining Constraints
- From 2D Sketch to 3D Model
- Extruding Sketches (Create > Extrude)
- Sketches vs Bodies vs Components vs Assemblies
- Exporting 3D Models
- Whats a mesh? (Think Minecraft or Low poly art.)
- 3D meshes are defined using the STL file format.
- Mesh Refinement (Higher Quality = More Triangles). Example: Stanford Bunny
- Example: Viewing Meshes in Meshlab
A Step Further
- Making Mechanical Drawings (2D) (aka Making 2D blueprints)
- File > New Drawing From Design
- How to Create a Drawing From Your Design (Video)
- Defining a Parametric Model
- User Parameters ("Sigma" Icon)
- Change Parameters Dialog Box
- Equations and Parameters in Dimensions
Assignment 5: Parametric Modeling
Generate a parametric 3D model using Fusion 360. Choose one of the possible directions below. Perhaps your final project concept will require a digital (rendered) or physical (fabricated) 3D model -- identity design parameters that meet your project requirements and goals and proceed to create one or more models.
Possibilities:
- Envision and define an original 3D model.
- Reverse engineer (analyze, deconstruct, and interpret) an existing 3D form and create a model based on your analysis.
- Locate an example (walkthrough, tutorial, etc) of a 3D model that you wish to create and follow it with modifications for your use case.
Deliverables:
- A 1-2 min video screen capture showing your model in Fusion 360. Feel free to talk (in your video) about the model itself, inspirational findings, the process you went through, the tools you explored along the way, and the challenges you encountered.
- A blog post documenting your experience and explorations (You many also document your experiences in your video and embed the video in your post). Include in your writeup any of the above items, hurdles you encountered and how you overcame them? What worked and what didn't? What new tools did you try? Embed your video into your blog post.
- Export a mesh (STL File) of your model and upload it to Sketchfab (You will need to make an account). Once uploaded to Sketchfab, embed your uploaded model into your blog post. Here's a tutorial about how to do this. This is basically the same as embedding a Youtube video into a blog post, but with a 3D viewer window containing your model, which you can manipulate and even visualize in VR! Cool eh!? (Wonder what JS libraries they are using to make this possible?)
Share the URL to your post on slack #cmstudio.
CM1 [Tues]: Due Oct 16
CM2 [Wed]: Due Oct 17
Resources
- Fusion 360 Gallery
- Fusion 360 Manual
- Learn Fusion 360 in 60 Mins
- Fusion 360 Design Academy
- Fusion 360 Adoption Portal
- Fusion 360 Forum - Need help? Check here.
- Tutorials
- Arduino UNO Enclosure Tutorial (Arduino UNO Model, Arduino Drawing), Shorter version
- Parameter Driven Project Enclosure
- Bookshelf Tutorial - Watch to get a good walkthrough of sketching basics.
- Making Parametric Models in Fusion 360
- Easy Snap Fit Cases
- Udemy: Product Design in Autodesk Fusion 360 from idea to prototype
- Thingiverse - A giant repository of 3D models and projects.
Week 8: Parametric Design with Rhino
Oct 16 / Oct 17
CM Work Session - Friday, Oct 19 9am - 12pm. I'll be at the studio for anyone that needs extra help on assignments and projects.
Fusion 360: What did you make?
Rhino Overview
- What is Rhino?
- Rhino is a CAD tool for designers and architects. It's considered one of the standard 3d modeling tools for product designers across many different industries.
- Rhino Download for macOS - Free for 90 days. Edu License available for ~$90 @ CU Bookstore. Rhinoceros will be in your Applications folder after install.
- What is Grasshopper?
- Grasshopper is a plugin for Rhino. It's now included with Rhino for macOS when you install. You access it by typing
Grasshopperinto the command interface in Rhino. We will explore this tool next week.
- Grasshopper is a plugin for Rhino. It's now included with Rhino for macOS when you install. You access it by typing
- Differences between Rhino for Windows vs Rhino for macOS
- Rhino for Windows is much older than Rhino for macOS and therefore contains a bit more functionality.
- Rhino 5 for Windows commands not in Rhino 5 for Mac
- Grasshopper is included with macOS v5 and Windows v6, but not Windows v5.
- What kinds of things are possible with Rhino + Grasshopper? Why use them?
- There are many design oriented or industry specific reasons but one BIG reason to use the tool is for its extendability through plugins (food4Rhino) for both Rhino and Grasshopper. Plugins such as Grasshopper open the floodgates for exploring parametric design and generative design.
Parametric design is a process based on algorithmic thinking that enables the expression of parameters and rules that, together, define, encode and clarify the relationship between design intent and design response. (Source: Wikipedia), Google Search
What types of objects can be considered "parametric"?
Anything really! Just a few examples: Cups, Vases, Pitchers, Bottles, Bells, Bowls, Clothing, Furniture, Lighting, Buildings!... and more!
- Parametric Design Examples
- Co-de-iT
- Zha Code Edu
- Designmorphine
- Opendesk
- Formlabs Digital Factory Pens
- New Balance 3D Printed Shoe
- Nervous System Kinematics Dress
- Razor Maker by Gillette / Gillette Uses 3D Printing to Unlock Consumer Personalization
Intro to Rhino (Workshop)
Objective: Become familiar with the Rhino interface and workflow in order to create 3d models.
Interface Basics
- Understanding the User Interface
- Viewports (Top, Left, Right, Perspective)
- Coordinates (X, Y, Z). X = Red, Y = Green, Z = Blue
- Windows (Multiple Windows Open == Multiple Files Open)
- Render Modes (Wireframe, Ghosted, etc)
- Toolbars (macOS)
- Left Sidebar - Command Line, Osnaps
- Right Sidebar - Layers
- Buttons = Commands. Almost all buttons are tied to a command you can type in.
- Menus / Sub-Menus (Little triangle on a button)
- The Command Line - Just type something...anything. See what happens! ESC to exit command. Repeat last command with Right Mouse Button > Repeat Command.
- Movement (Zoom (Two-finger pinch),
ZS, Pan (Right mouse click), Orbit, Gumball)- macOS Tip: Turn off two-finger mouse zooming (but allow pinch zooming) by unchecking "Enable magic mouse gestures" under Rhino > Preferences > Mouse > Magic Mouse.
- Hiding / Showing objects (Light Bulb on Layers; Hide / Show Commands)
- Units - Changing Units, Grid (File > Settings > Units)
- The Grid (File > Settings > Grid to change), Osnaps (Snapping options on bottom half of left sidebar)
- Working with Layers (Right Sidebar)
- Layer Name
- Colors (RGB)
- Hide/ Show(Light Bulb)
- Active Layer (Radio Button) - This determines where you are creating new geometry.
- Other Panels - Object Properties, Display Properties, etc
Geometry Basics
- Drawing Geometry
- 2D Geometry - Curves, Surfaces, Polycurves, Text
- 3D Geometry - Surfaces, Polysurfaces, Solids
- Isocurves - "Hidden" curves located on / making up surfaces.
- Object Details (Selection) - See information about a selected object in the lower right sidebar.
- NURBS (Non-uniform rational B-spline) vs Mesh
- Turn On/Off points on curve with
PointsOnandPointsOffor F10 key.
- Transform Commands
CopyMoveScaleRotate
- Manipulate Geometry
Explode,Join- Join vs Group
Trim- Selection -
SelCrv,SelSrf,SelPts LoftPipe
File Input / Output
- File types: 3DM, STL, OBJ, EPS, DXF
- How should you export a file for fabrication using 3d printing / milling, etc?
Additional Commands
There are many commands available in Rhino. Above and below are just a few of the most used commands. Check out the Rhino 5 Command List and Rhino 5 for Windows commands not in Rhino 5 for Mac to learn more.
PictureFrameContourMeshtoNURBDistanceDimBooleancommandsHide/ShowOffsetDupBorderExtractWireframeTextTextObjectSelDupExtrudeSrf
Generator or "Factory" Example
- Produce variations of a 3d model from a "generator" or "factory". This means to work iteratively to explore a form making process. This process takes advantage of the History command to associate recorded parameters to each other, which is a characteristic of Parametric Modeling as done naturally in Fusion 360 and further enabled through Grasshopper.
- Examples: cm-design
- Parametric Loft Generator
- Parametric Revolve Generator
Assignment 6: Form Finding
Explore form finding through the iterative "factory" or "generator" approach discussed in class. Work iteratively to generate at least 10 variations of a form which you may then render any way you wish. Meaning, you may save STL files out and place them into a Sketchfab viewer, or render using a dedicated render solution such as Keyshot, Octane Render, Fusion 360's render workspace, or save screen shots from Rhino (Use the ScreenCaptureToFile command to save screen shots from the viewport).
Perhaps your final project concept will require digital (rendered) or physical (fabricated) 3D models -- use form finding as a tool to identity interesting forms and shapes that meet your project requirements and goals and proceed to create one or more models.
Deliverables:
- A 1-2 min video screen capture showing your form finding explorations in Rhino. Feel free to talk (in your video) about the model itself, inspirational findings, the process you went through, the tools/commands you explored along the way, and the challenges you encountered.
- A blog post documenting your experience and explorations (You many also document your experiences in your video and embed the video in your post). Include in your writeup any of the above items, hurdles you encountered and how you overcame them? What worked and what didn't? What new tools did you try? Embed your video into your blog post.
- Export meshes (STL File) of your model and render them using a dedicated render solution or upload it to Sketchfab and embed your uploaded model(s) into your blog post. Look at the previous assignment for tutorial about how to do this.
Share the URL to your post on slack #cmstudio.
CM1 [Tues]: Due Oct 23
CM2 [Wed]: Due Oct 24
Resources
- Parametric Design: a Brief History
- Rhino
- Rhino Tutorials
- food4Rhino - A large repository of plugins available for Rhino and Grasshopper. Most are free and/or open-source.
- Think Parametric: Rhino 101 - Fundamentals of 3D Modeling
- Plethora Project: Rhino Tutorials
- Lynda.com Rhino 5 Essential Training
- Form Finding Inspiration
- Rendering Tools
- Pasta by Design
Week 9: Intro to Grasshopper / Rendering
Oct 23 / Oct 24
CM Work Session - Friday, Nov 9 9am - 12pm. I'll be at the studio for anyone that needs extra help on assignments and projects.
Rhino: What did you make?
Intro to Grasshopper (Workshop)
Grasshopper is a plugin for Rhino. It's now included with Rhino for macOS when you install. You access it by typing Grasshopper into the command interface in Rhino. It will open another window that overlays the Rhino window. Just position Rhino on half of your screen and Grasshopper on the other half. Google Search: Rhino Grasshopper
Interface Basics
- Setting Units (in Rhino)
- Arranging windows / Hide show Grasshopper
- Dual monitor is ideal setup to see both Rhino and Grasshopper
- The Canvas (where you drop components)
- Double click to type in name of a component you want to add
- Space bar to access quick commands like preview, bake, and preferences
- Recent commands bar (on bottom left)
Tool Bars & Component Groups (Tabs)
- Primitives
- Math
- Set
- Vec
- Curve
- Surface
- Mesh
- Intersect
- Transform
- Display
Working with components
- Drag and drop components into the canvas
- Selecting components
- Tooltips
- Connecting / Disconnecting components
- Aligning components
- Messages (Orange and red bubbles on component)
- Grouping components
Working with geometry
- Assigning Rhino geometry to Grasshopper components
- Creating Grasshopper based geometry and visualizing it in Rhino
- Baking geometry (Geometry in Grasshopper -> Rhino)
- Points, Lines, Planes, Volumes
Examples: Contouring, Lofting, Vase Builder
Rendering with Keyshot
Keyshot is an entry level rendering tool. It features drag and drop material, color, lighting, environments, and more. Download the 14 day trial to start experimenting. Go through the Keyshot Tutorials to get a basic understanding of the tool and how to use it.
Basic Process:
- Export a 3D model file from CAD (Rhino 3dm, STL, etc)
- Import into Keyshot
- Compose the scene
- Assign materials, lighting, environment, etc
- Save a screenshot. Depending on how powerful your computer is, you will have to wait longer for better screenshot renders.
Tips:
- The demo doesn't let you save the project file. Save lots of screenshots!
- Use the "screenshot" feature to save decent looking images from the viewport. It saves them into
Library/Application Support/Keyshot8/Renderings/ - To increase resolution of a screenshot make your window full screen and use the "Reitna Mode" feature. Your computer may slow down a bit more doing this but it will give you a higher resolution image in the end.
- Don't bother with the Render mode since it puts Keyshot watermarks all over the image. The screenshot tool only places a small mark in the bottom left corner (easily removable via Photoshop).
Digital Object Workflows
- Rhino --> Meshmixer --> Keyshot
- etc...
Project 3: Building Digital Objects
Create a project that makes use of any of the CAD tools explored this phase (Fusion 360, Rhino, Grasshopper) and/or any other CAD tools (Blender, Maya, Sketchup, Meshmixer, Meshlab, etc) that enable the creation and manipulation of 3D digital objects and explore a rendering solution to produce multiple high fidelity representations of your concept.
Tip: I encourage you to think about all CAD tools as a part of a larger digital modeling workflow. Most of time time there is not one tool that does everything you want or imagine possible. You might have to enlist different tools in combination to accomplish a task. For example, generate geometry in Rhino, manipulate meshes in Meshmixer, render in Keyshot.
Possible project directions
- Advancing your final project concept.
- Iterate on a previously explored concept.
- Form finding explorations and application.
- Choose an existing product or design to analyze and deconstruct its systems of logic. Then proceed to construct a version of it using CAD.
- Remixing or mash-ups of existing designs and parametric techniques.
- Developing a learning pathway (one or more tutorials or a workflow of your own) to share publicly.
- Develop one or more models that could be 3d printed or digitally fabricated.
- Something else?
Think about the following questions to help you define your project scope.
- What is the purpose / goal of your project?
- What kind of problem does your design solve?
- Where can you apply CAD in the process?
- Where can you apply rendering in the process? (ex. Showing product design to client)
- What designs, shapes, and/or forms inspire you?
- What might you want to 3D print or make a physical version of?
Deliverables:
-
Documentation including a project writeup, sketches, screenshots, and 2-3 min video walkthrough of your process. Describe in your video and in your writeup, the project motivation, objectives, tools used, challenges encountered, and possible next steps if and/or when you are to go a step further. Embed your video into your blog post.
-
Render multiple instances (at least 4 images) of your project and include them in your blog post. How do you envision your digital objects? What kind of materiality might they have if you made them in reality? What kind of physical setting do you imagine them in? Explore ways of visualizing and communicating your concepts. As with the previous assignments, use Sketchfab to embed one or more 3d visualizations into your blog post. In addition, explore a rendering solution such as Keyshot or Fusion 360's render workspace to begin creating higher fidelity representations of your concepts. This is a great article on 25 of the best rendering tools of 2018. I recommend using Keyshot since it has a free trial and produces decent renders by using the "Screen shot" feature. You are free to use any rendering solution you find interesting.
Make sure to give credit to any related projects, code, websites, articles, images, videos, or other source materials used by including them in your project writeup.
Share the URL to your post on slack #cmstudio.
CM1 [Tues]: Due by 11:59pm Oct 30
CM2 [Wed]: Due by 11:59pm Oct 31
Resources
- Grasshopper Website
- Grasshopper Primer - A great entry point to Grasshopper.
- Visual Programming in Rhino3D with Grasshopper / Amazon
- Think Parametric: Grasshopper 101 - Introduction to Parametric Modeling
- food4Rhino - A large repository of plugins available for Rhino and Grasshopper. Most are free and/or open-source.
- Grasshopper Plugins
- Bifocals - This is a great plugin for seeing what a component is called within a definition.
- Everything is a Remix
- 25 Best 3D Rendering Software Tools of 2018 (Some are Free)
- Keyshot Tutorials
Phase 4: Digital Fabrication
 Source: Eggs (2013), Studio Courses by Andrew Kudless, California College of the Arts, S.F., and Bond University, Gold Coast, Australia by Matsys
Week 10: Intro to Digital Fabrication / 3D Printing
Oct 30 / Oct 31
CM Work Session (Next Week) - Friday, Nov 9 9am - 12pm. I'll be at the studio for anyone that needs extra help on assignments and projects.
Project 3 Presentations - We will take some time for everyone to share their Project 3 and get feedback.
What is Digital Fabrication?
Digital fabrication is a type of manufacturing process where the machine used is controlled by a computer. The most common forms of digital fabrication are CNC Machining, Laser Cutting, and 3D Printing. (Source: Open Desk), Google Search, Digital Fabrication Pintrest Board by Nazım Dağdeviren
Overview of CAM
- Computer-aided machining (CAM) is an application technology that uses computer software and machinery to facilitate and automate manufacturing processes. CAM is the successor of computer-aided engineering (CAE) and is often used in tandem with computer-aided design (CAD). (Source: Wikipedia)
- Computer numerical control (CNC) is the automation of machine tools by means of computers executing pre-programmed sequences of machine control commands. This is in contrast to machines that are manually controlled by hand wheels or levers, or mechanically automated by cams alone. (Source: Wikipedia)
- Understanding Toolpaths
- What is a toolpath?
- What is GCODE?
- Economies of Time and Tooling
- Which fabrication process do I choose?
- Is this the right process to produce my model?
- Does the time and tooling required make sense to accomplish my goal?
- Low to high resolution prototypes
- Considering material and application
- Basic process to prepare files for fabrication
- Create your design as 2D curves or 3D model using CAD package (Rhino, Fusion 360, etc).
- Generate toolpaths using CAM software. (For example, Cura is a "Slicer" which is a type of CAM software, Fusion has CAM tools built in, and RhinoCAM is a CAM package/plugin for Rhino.). The input to the CAM software will be based on the fabrication process. The toolpaths saved out of a CAM package are always a machine code file (ie. GCODE or a variation of it).
- Run the GCODE file using a controller/software for the fabrication process. (For example, the Ultimaker's controller is on the machine itself. You just tell it which GCODE file to read from the USB drive. This is similar to a laser cutter with a built in controller and memory. In the case of a vinyl cutter, CNC router, or CNC milling machine, the controller is commonly a computer connected to the machine sending chunks of data as the file is read. In the case of the Bantam Mill, we use their tool known as Bantam Tools.)
- CAD to CAM Workflows
- Working with 2D curves - Illustrator, Rhino, Fusion 360
- Working with 3D geometry (meshes, etc) - Fusion 360
- 3D file types - STL (most common)
- Examples - Cut (Mill), 3D to 2D Contouring/Slicing (Laser)
3D Printing (Workshop)
Types of 3D Printing
- FDM (Fuse Deposition Modeling) / Filament Based - Ultimaker, Lulzbot, Makerbot, Markforged, Wasp
- SLA (Stereolithography) / Resin Based - Formlabs Form 2, Ono
- SLS (Selective Laser Sintering) / Powder Based - Shapeways, Formlabs Fuse 1
- Polyjet (Material Jetting) / Resin Based - Stratasys (Multi-material)
Slicing
Slicing tools convert a 3D mesh (STL) into GCODE (aka a list of commands to run the printer)
- Cura is what we use for the Ultimaker. Cura Manual
- Slicing Process
- Load STL file into Cura
- Choose PLA material for Extruder 1 and PVA for Extruder 2 (If using support material)
- Choose a print profile (aka Layer Height: Start with Fast or Normal options)
- Choose an infill (Density)
- Save GCODE file and copy to blue USB drive
Materials
We currently have limited supplies. I recommend purchasing a roll of PLA (and PVA if you need it) from Gizmodorks or Amazon.
- FDM Materials Overview
- PLA from Gizmodorks and ABS are the most common. Other materials: Nylon, HIPS, TPU.
- PVA from Gizmodorks is used as support structure material for building complex parts.
Meshes
- STL File Format for 3D Printing / STL (file format)
- Tools for working with meshes
- Meshlab - Good for viewing meshes.
- Meshmixer - Good for manipulating meshes in preparation for printing.
- Netfabb - Good for looking at STL dimensions and repairing meshes before importing to Cura.
- Pleasant3D (MacOS) - Utility for quick viewing/resizing of STL files. MacOS only.
-
Assignment 7: Bits to Atoms
Create / remix / mashup a product design concept and 3D print it. Use the opportunity to advance your skills in designing for 3D printing in any of the following areas: new forms, objects from from finding explorations, complex geometry, multipart assemblies, tolerances, designing with fasteners (screws, etc), designing objects that snap fit, flexible materials such as TPU, print quality and resolution for a given application, embedding electronics such as sensors and LEDs, low to high resolution prototyping, or anything challenging your understanding of printing, materials, or form printability.
Tips: Explore some of the resources listed for 3D printing. Look through the design guides below and seek out additional resources to aid your design process. As with most ideas turned into CAD models, I suggest start by hand sketching your ideas out. Think about the problem you wish to solve or the questions you have around whats possible with this tool / medium / material.
Think about the forms you want to model, the parts you want to use in an assembly, the mechanical movements you wish to explore, etc. Don't let the tools or process get in the way of you producing an instance of your idea. Start simple and make many iterations until you get to something that communicates your intent.
Pay special attention to your print times and plan jobs accordingly. Since others will be trying to print something over the week, this may mean staying late to "manage" the print job or working together via slack to manage a "print queue". Meaning, work together to establish a schedule for print jobs.
Deliverables:
-
Documentation including a project writeup, printing photos/video, photos of the 3d printed object(s), and a 2-3 min video walkthrough of your design process and final results. You may show the steps of the process in your video.
Describe the project motivation, objectives, challenges encountered, and possible next steps if and/or when you are to go a step further. What problem you were trying to solve? What tools did you choose to work with? What part of the printing process did you find most interesting and the most challenging? If you chose to make progress on you final project, which milestones did you hit and whats next? Be sure to credit any tutorials, videos, images, blog posts, etc that you use. Embed your video into your blog post.
-
Physical model(s). Place all models produced on the black shop table. Label your model with a title and your name.
Share the URL to your post on slack #cmstudio.
CM1 [Tues]: Due Nov 6
CM2 [Wed]: Due Nov 7
Resources
- Additive Manufacturing Technologies: An Overview
- Design Guides - Think of these are useful resources regardless of the printing process.
- What is the best type of plastic for my 3D printing application?
- How to Design Snap Fit Components
- How to Choose the Best Fasteners for 3D Printed Parts
- Shapeways: Modeling & Design Tips 3D Printing Tutorials
- Simplify3D: Print Quality Troubleshooting Guide
- Repairing 3D Files With Meshmixer and Netfabb
- Adding Screw Threads
- i.materialise Design Guide
- 5 Mistakes to Avoid When Designing a 3D Model for 3D Printing
- Key design considerations for 3D Printing
- Enclosure design for 3D Printing: A step-by-step guide
- Formlabs Tutorials - Good design references even though we don't have a Formlabs SLA printer.
- Meshmixer
- Post Processing
- Projects / Inspiration
- Thingiverse
- Microscape - 3D printed cityscapes
- Paper: Thingi10K: A Dataset of 10,000 3D-Printing Models, Website
- More Resources
- Print the Legend (Netflix)
- Udemy: Designing for 3D Printing with Fusion 360
- Thingiverse
- "Full Printed" by nueveojos (Length: 4:45)
- Visualizing Mathematics with 3D Printing by Henry Segerman
Week 11: Digital Fabrication Methods
Nov 6 / Nov 7
CM Work Session - Friday, Nov 9 9am - 12pm. I'll be at the studio for anyone that needs extra help on assignments and projects.
Topics
- Contouring 3D shapes to make 2D slices (Slicing 3D shape into stackable parts)
- Triangulate a 3D object (aka make it faceted. ie. Blue Bear, Stanford Bunny)
- Waffle (aka make slotted 2D slices from a 3d model)
- Unrolling 3D geometry to make 2D curves (ex. Platonics, shapes with Tabs)
- Working with meshes
- Importing / Exporting in Fusion and Rhino
- Import mesh and make NURBS (mesh data from Thingiverse or 3D Scanning)
- Working with 3D scanner data (scanning, cleaning, processing)
- Export meshes for 3D printing (checking geometry)
Assignment 8: Realizing Digital Objects
Explore one or more digital fabrication methods (contouring, triangulation, waffle, unrolling geometry, or some combination of these) and produce a physical instance of it.
For example, you might have a 3d model that you would like to produce at large scale. Larger than might be possible in a single 3d print within a reasonable amount of time. What method would you use to produce your model? What if the model were triangulated? Or contoured? What material would you choose? What steps need to be taken in the digital domain to translate into components that can be produced and assembled physically?
Deliverables:
-
Documentation including a project writeup, build photos/video, photos of physical object(s) produced, and a 2-3 min video walkthrough of your design process and final results. You may show the steps of the process in your video.
Describe the project motivation, objectives, challenges encountered, and possible next steps if and/or when you are to go a step further. What problem you were trying to solve? What tools did you choose to work with? What part of the process did you find most interesting and the most challenging? If you chose to make progress on you final project, which milestones did you hit and whats next? Be sure to credit any tutorials, videos, images, blog posts, etc that you use. Embed your video into your blog post.
-
Physical model(s). Place all models produced on the black shop table. Label your model with a title and your name.
Share the URL to your post on slack #cmstudio.
CM1 [Tues]: Due Nov 13
CM2 [Wed]: Due Nov 14
Resources
- Platonic Solids
- Rhinopolyhedra (Rhino Plugin, Windows Only)
- Unrolling
- Contouring
- Triangulation (Faceted)
- Waffle
- YoutTube: grasshopper tutorial # waffle structure ribs part 1
- YoutTube: grasshopper tutorial # waffle structure (ribs) laser cut file part 2
- Sectioning design systems by HASSAN RAGAB
- YouTube: Waffle structure - Grasshopper Tutorial
- YouTube: Grasshopper 006 waffle structure beams concept & fabrication - Put this on MUTE!
Week 12: Open Studio
Nov 13 / Nov 14
Potential Topics
- Fusion 360 CAM
- Bantam Mill (Workshop)
- Arduino and Raspberry Pi
- Rhino / Grasshopper (Workshop)
Final Project Proposal
Submit a revised or updated final project proposal anytime before Friday Nov 16th (The Friday before Thanksgiving Break). The earlier the better so you have time to ask questions, order any supplies you may need, etc.
Deliverable:
A new or updated final project proposal posted to your blog. It should include the following:
- Project Title
- Project Summary ~ 1 page max (ie What is it? What problem(s) are you solving? What will it do? How will it work?)
- Key components of your project (ie. Resources, skills, and technology needed to realize it ~ Materials, CAD, 3d Printing, Bantam Mill, Processing, Arduino, Shapeways, etc)
- Milestones you have hit thus far and what you plan to do in order to realize it in the weeks following Thanksgiving break. If you need to order some parts, what do you need? What questions do you have? Where do you feel you are lacking in skill and need assistance?
Share the URL to your post on slack #cmstudio.
Thanksgiving Break (No Class)
Phase 5: Final Project
Week 13: Open Studio
Nov 27 / Nov 28
Final CM Work Session - Friday, Nov 30, 9am - 12pm. I'll be at the studio for anyone that needs extra help on assignments and projects.
- Open Studio
- Project Checkins
Week 14: Open Studio
Dec 4 / Dec 5
- IMPORTANT: Please complete the course evals (FCQ's) for CM1 or CM 2 by going to colorado.campuslabs.com/courseeval. You will need to authenticate using your campus user ID. The course eval period is from Dec 3 to Dec 10.
- Open Studio
- Project Checkins
Week 15: Final Project Presentations
Dec 11 / Dec 12
CM Studio: Final Project Showcase - Wednesday December 12, 2018
To wrap up the fall semester in CM Studio 1 & 2 we have two events coming up. Both events are free and open to the public. 1301 Walnut St. Boulder, CO
-
Join us for the CM Studio: Final Project Showcase at 4:30pm doors / 5pm presentations, Wed, Dec 12. Students will present their final projects.
-
I AM WHAT I WISH, an interactive art installation that explores the power and influence of wishes through physical and digital representations. Wed, Dec 12th from 6 - 8 PM. Students: Jonas Escobedo, Allison Spiegel, and Makenna Considine
Last Day of Classes - December 13, 2018 - All projects (P1, P2, P3, Final) need to be turned in by this time to receive credit.
Final Project Deliverables
-
Prepare and deliver a 8-10 min presentation at the showcase. Assume the audience knows nothing about your work or what you have made.
- What problem did you set out to solve?
- What is your project all about?
- How did you accomplish your goals?
- What resources did you make use of?
- What challenges did you encounter and how did you overcome them?
- What worked? What didn't?
- If this is a part of a larger long-term project, what milestones did you hit?
- What's next for this project? (Future Work)
- What are your major takeaways? What did you learn / discover?
-
A blog post summarizing your project and development process. Include any images, video, and code in the writeup. Be sure to include links to past blog posts and any resources used in the process.